I've been working a lot of SKCC CW stations during the holidays and adjacent stations really interfere with my ability to use the vintage Ten-Tec Century/21. Its built-in audio filter is relatively effective if the band isn't too crowded but if I'm working a station and others pop up within a 1kHz on either side I have a real hard time keeping track of which QSO to listen to. I wanted some relief from the relatively porous audio filtering provided by the old girl.
A kit from Elecraft seemed to be the ticket to better signal isolation for my old radio.
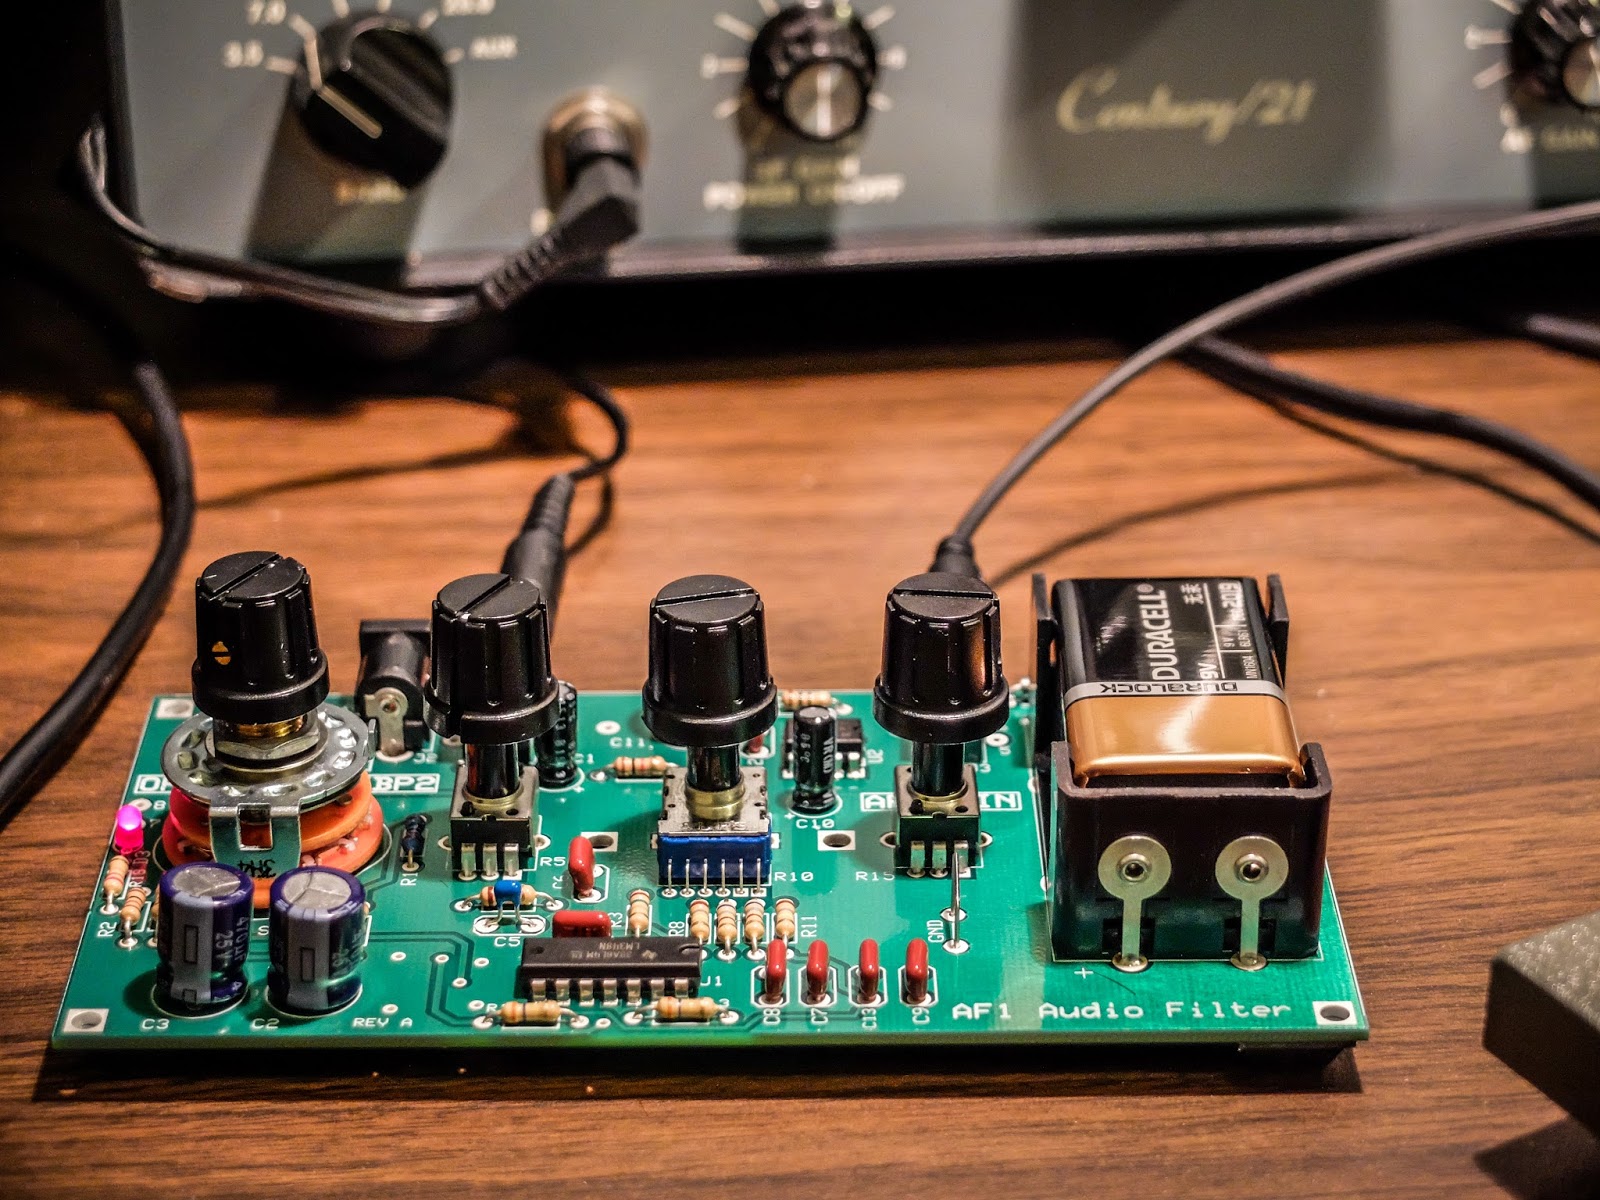
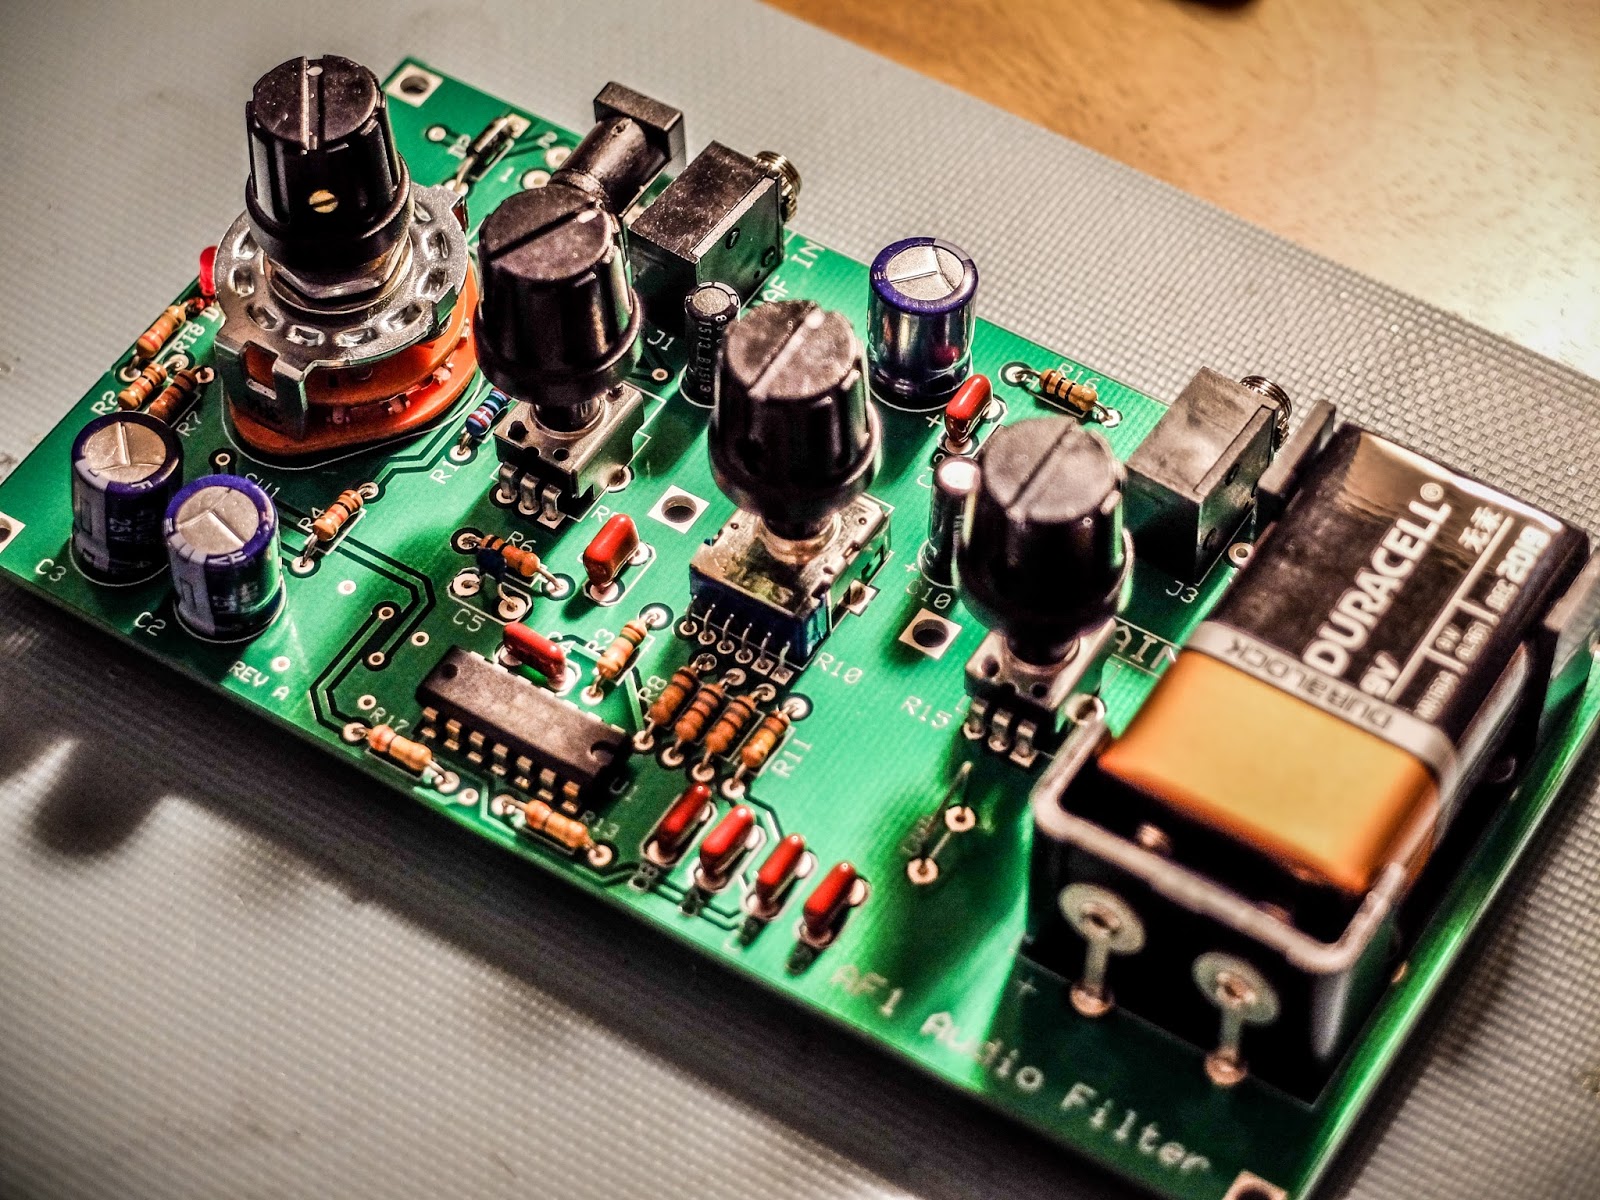
Elecraft AF-1 Audio Filter Kit
Building the kit
This kit is about $60 and is pretty easy to build There are a couple of ICs to solder so it will be easier if you have a temperature controlled, fine tipped soldering iron. Santa brought me a nice soldering iron for Christmas so this was my first chance to make some use of it. Everything about the kit is very straightforward and Elecraft has wonderful build instructions along with a well laid out board. Their instructions list components in the order that you will be installing them on the board, left to right and even include the color coding or numbering for resistors and capacitors right there in the instructions so you don't have to keep going back to look up the coding. I've only built one other kit previously and the Elecraft instructions are better.
My only gripe is that this kit has been out for quite some time, but for some reason they shipped me a Version "A" board that required a trace to be cut and a couple of jumpers installed to correct a board error. I would hope that they would ship new versions of the board but apparently you can get an old version. Next time I order a kit from them I may specify that I want the latest revision of the kit.
Performance
The board powered up and worked right as the last of the solder smoke was wafting away. I connected it to the Ten-Tec and tried to find some adjacent station operations to test against but the bands were not terribly busy tonight. I did manage to get a decent audio test on a calling station and created a video to demonstrate the board's capabilities.
Summary
This is the first kit I've built from Elecraft. It was a simple one. The instructions were excellent, the silkscreen layout on the board was straightforward and all the parts were in the bag. The kit does not come with an enclosure so it looks a bit unfinished and the knobs are a bit wobbly on their tall, plastic shafts. That is my only negative concern regarding the finished kit. Putting it in an enclosure would also require the battery holder to be moved to the bottom of the board to clear the shafts exiting the top of an enclosure. Certainly not a big deal but I would be willing to pay an extra $10 for a ready made enclosure because when I've tried to make them they look like junk.
But the bottom line is that if you have an older radio that lacks good filtering or you've built a homebrew radio that you want to be more usable on the air, the Elecraft AF-1 is an excellent addition. I think it is going to serve me well with my vintage radio. Now to find a project box to fit it.
Sometimes I needlessly struggle with a problem because I'm cheap.
My Vibroplex Vibrokeyer was manufactured in 1960. My Vibroplex Bug was manufactured in the mid 1970s. In both cases the once flexible, non-skid rubber feet have since turned to hardened rubber fossils. In order to use the keys without them skating all over the desk I employ a variety of non-skid solutions, except for the obvious.
For some reason I seem to have to move stuff on my desk all the time. I guess I'm never content and constantly reorganize the station and accessories. Inevitably I misplace a rubber mat or some rubberized shelf liner sticks out from under a key in an unsightly manner. In general it makes the station look shoddy.
2B Radio Parts, provide replacement parts for Bugs, paddles for various makes of keys. I ordered Replacement Vibroplex Bumpers (6 Bumper Pack). I wasn't aware the 'feet' were called 'bumpers', but there you have it... I have new rubber baby buggy bumpers for my bug and vibrokeyer.
The 6 bumper pack replaced the feet on both keys. In case you never noticed, many keys, including those made by Vibroplex, have 3 feet rather than 4. It keeps the key from rocking on a surface that isn't entirely level or flat.
Parts is Parts
The replacement feet... err... bumpers from 2B, fit fine. They were nearly an exact match for the old feet on the 1970s bug but were a smidge taller and slightly different design than those on the 1960 Vibrokeyer. The older key had a chambered, internal design that I'd guess had a bit more cushion back when it was new. 57 years later, the rubber foot is a brittle relic of its former self.
new bumper left, 1960 Vibrokeyer bumper right
new bumper left, 1960 Vibrokeyer bumper right
Ahhh, no more slip siding away
The old feet are simply held on by countersunk machine screws and the receiving holes in the new bumpers fit without a hitch.
Shod with new boots, shoes, feet, bumpers, whatever
My Vibroplex Bug has a more solid disposition as well now
The moral of the story is stop being cheap and buy some new feet!
That's all for now... So lower your power and raise your expectations P.S. Oh, speaking of which (lowering your power and raising expectations)... I was sending out my call on 7030 unsuccessfully a couple nights ago, for about 10 minutes. I was using my TenTec Century/21 at 5 watts QRP and getting lousy spots on RBN (6 to 9dB SNR). I decided to keep sending CQ a couple more minutes and was finally answered by S51MF, Franz in Slovenia, 4700 miles away. You just never know what your QRP signal is going to net you. 72/73 Richard, AA4OO http://hamradioqrp.com
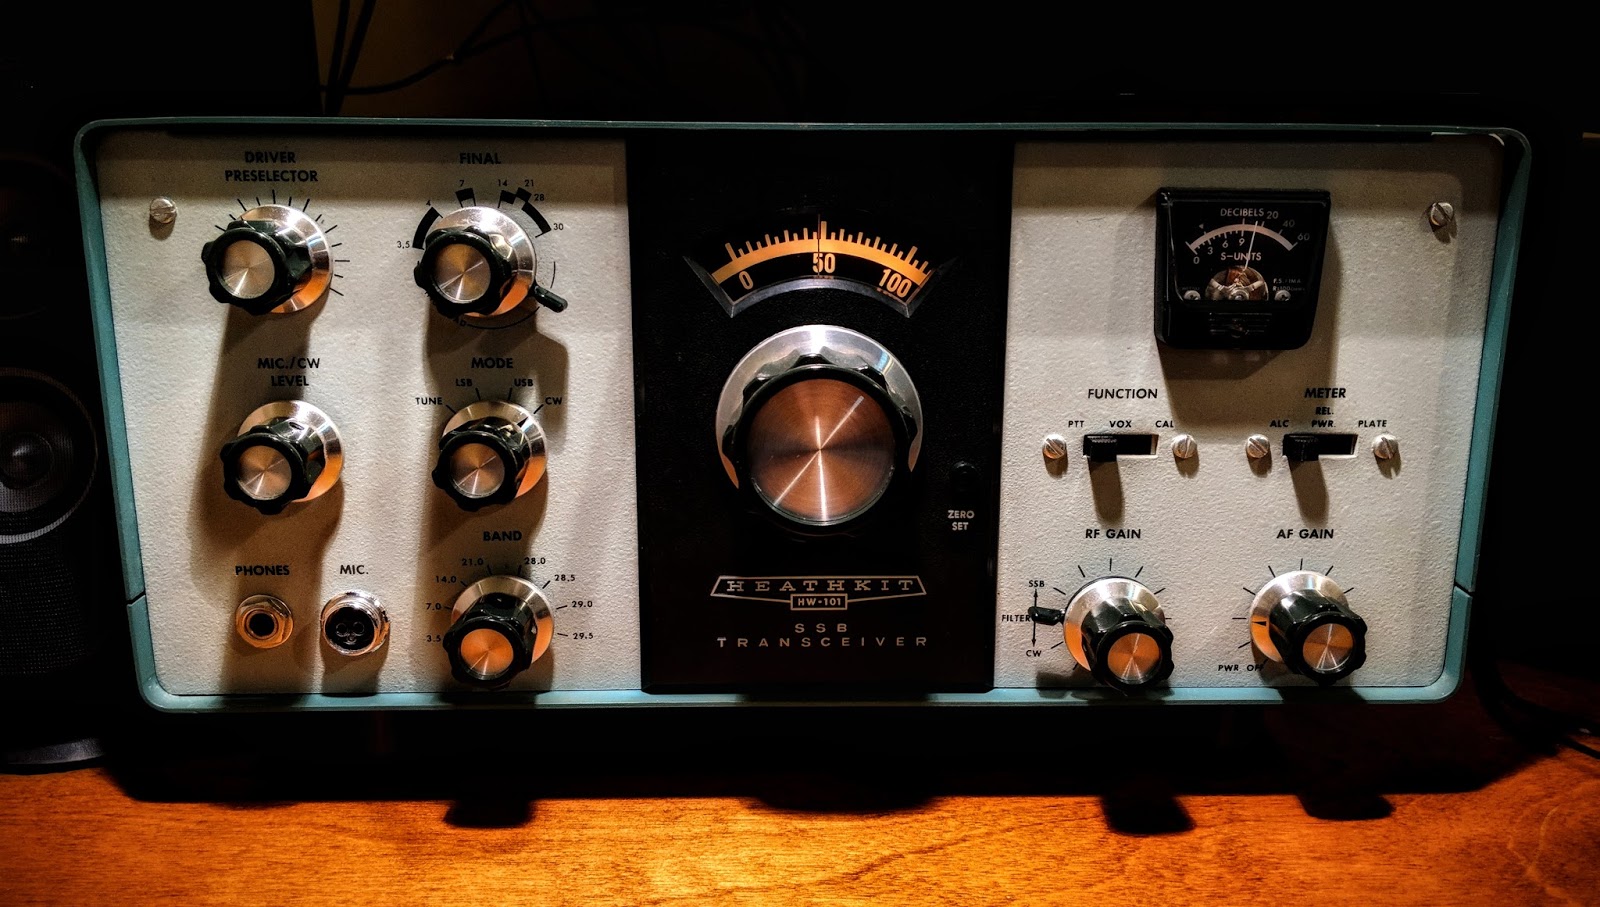
Heathkit HW-101 after it's first QSO under new ownership
I completed my rebuild of my Heathkit HP-23B power supply this morning. There was a bit of frustration on my part as I followed the instructions because they only have photos of a HP-23 which has adjustable bias and no LV switch.
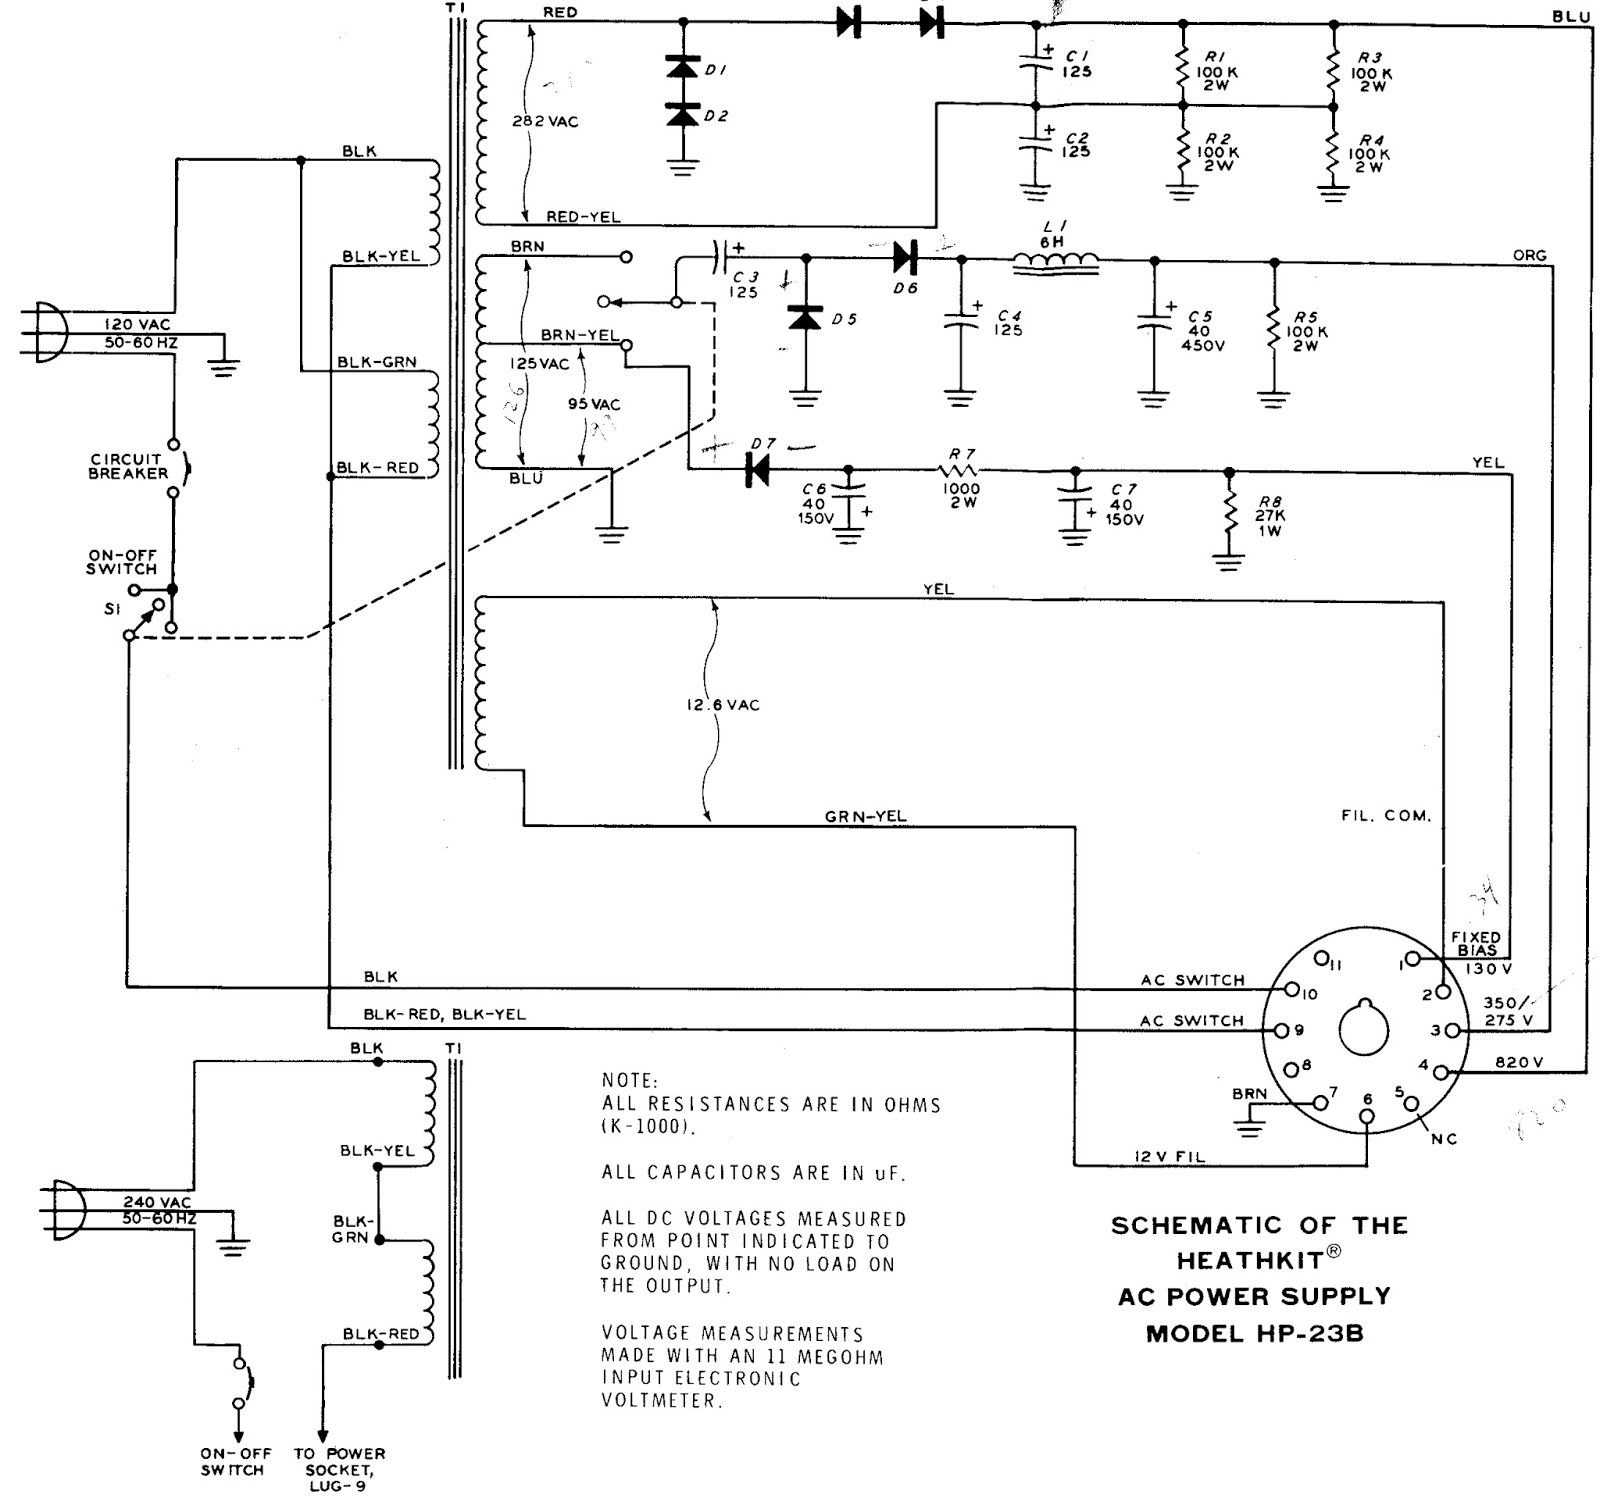
It left me scratching my head a couple times, and I had to locate a schematic of a HP-23B to complete the work.
Heathkit HP-23B Schematic
I really need to learn more about electronics
In the midst of the rebuild I thought I had a problem with the transformer. Both low voltage winding taps (275v and 350v) showed very low resistance (about 5 Ohms) to chassis ground, which led me to believe there was a short in the transformer.
I called my mentor in all things Ham radio, Paul AA4XX, and described the issue. He walked me through the schematic and had me unsolder a couple points to confirm his guess that all was well. That double tap, low voltage winding presents very low resistance to ground but it is not a short in the world of AC. I continue struggling to wrap my head around the differences in AC and DC, but I'm slowly learning and fortunately haven't caught anything on fire yet.
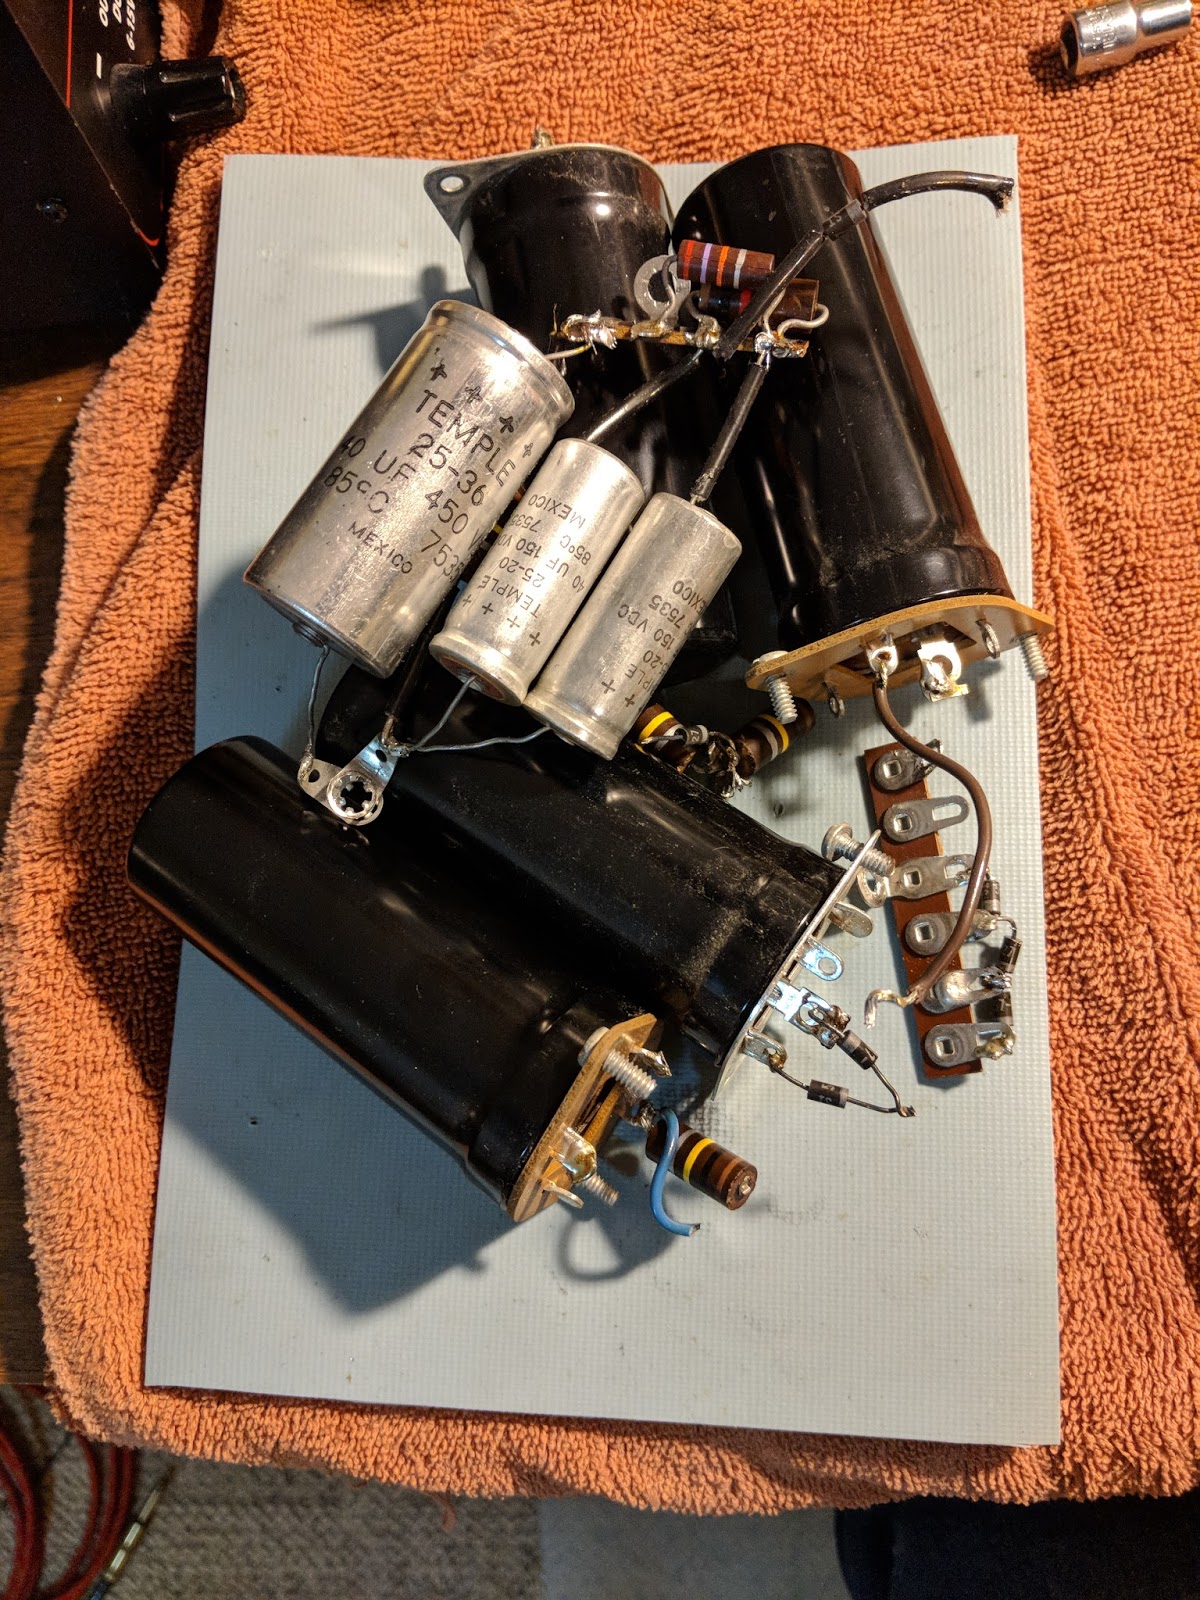
Out with the old, in with the new
Old components
Testing High Voltage
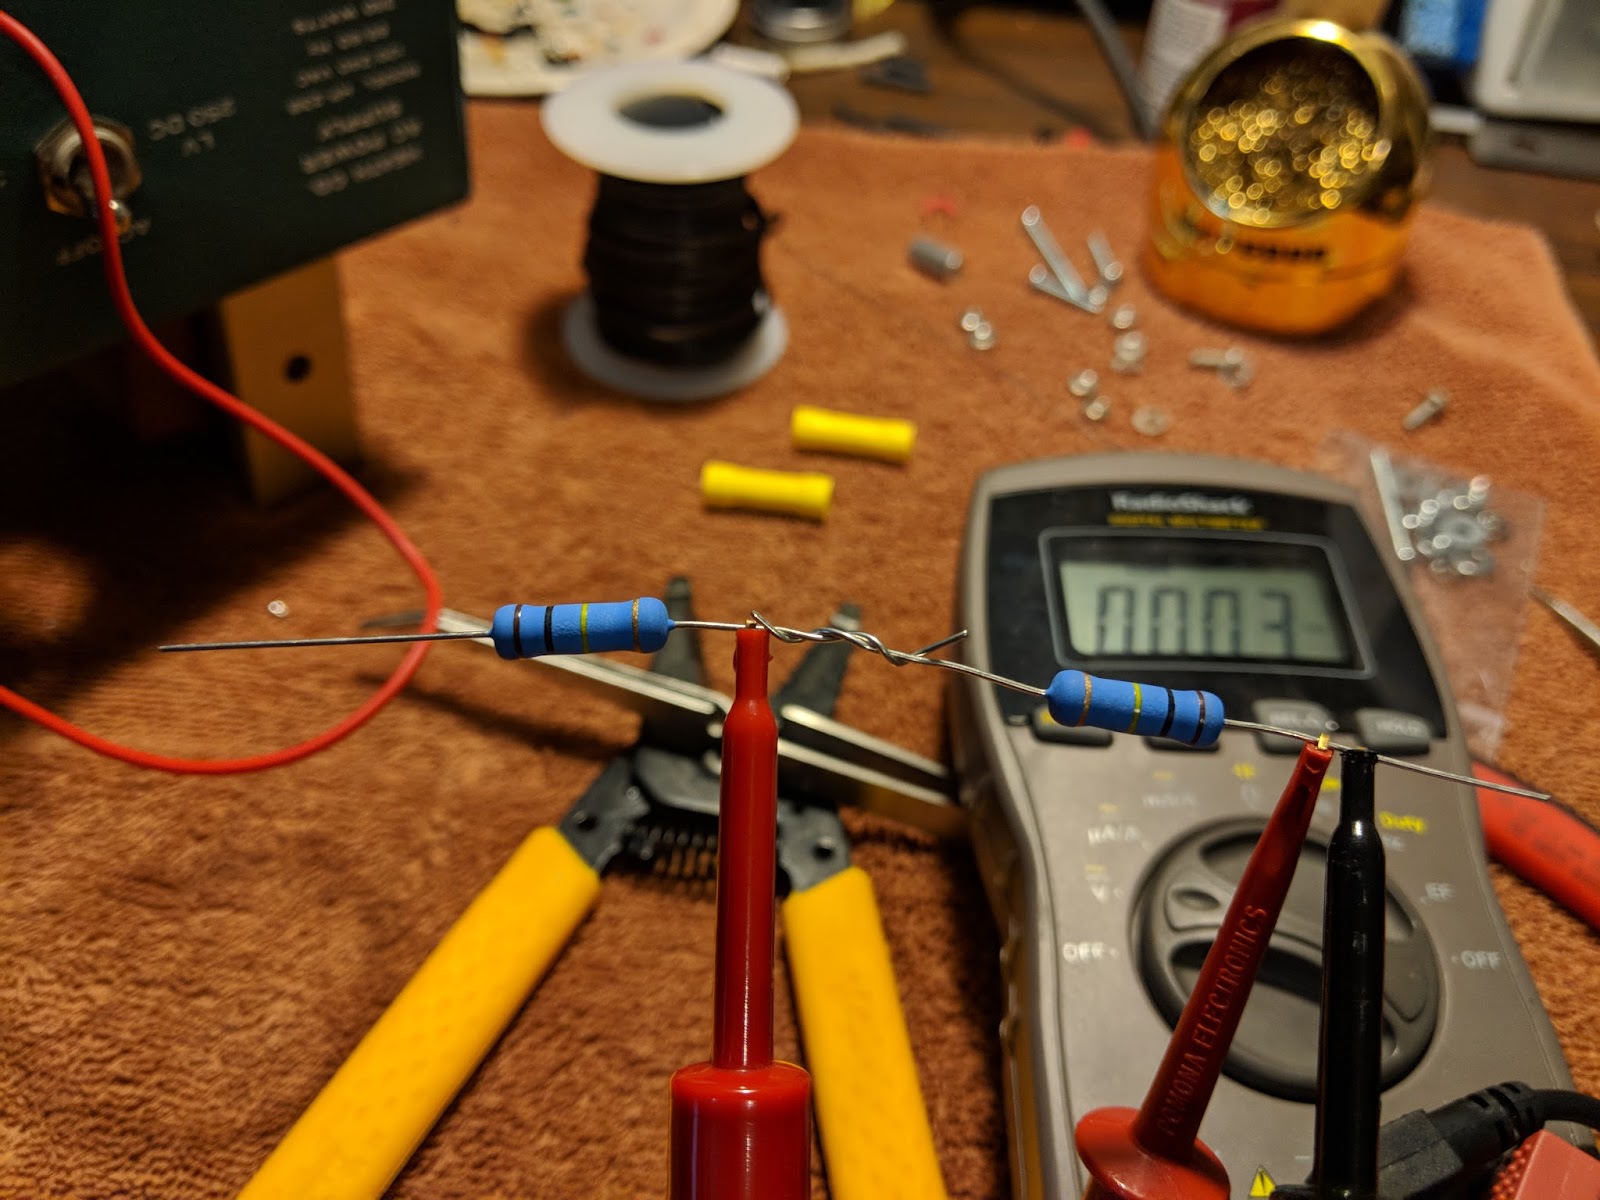
My Multi-meter can only measure up to 600v, so in order to measure the 800v output I used two 3 watt 100 kOhm resistors in series as a voltage divider. When in use, the MM will read half the voltage.
Voltage divider for measuring the high-voltage output
With the voltage divider the HV power measured 401v which works out to 802v undivided
Completed upgrade
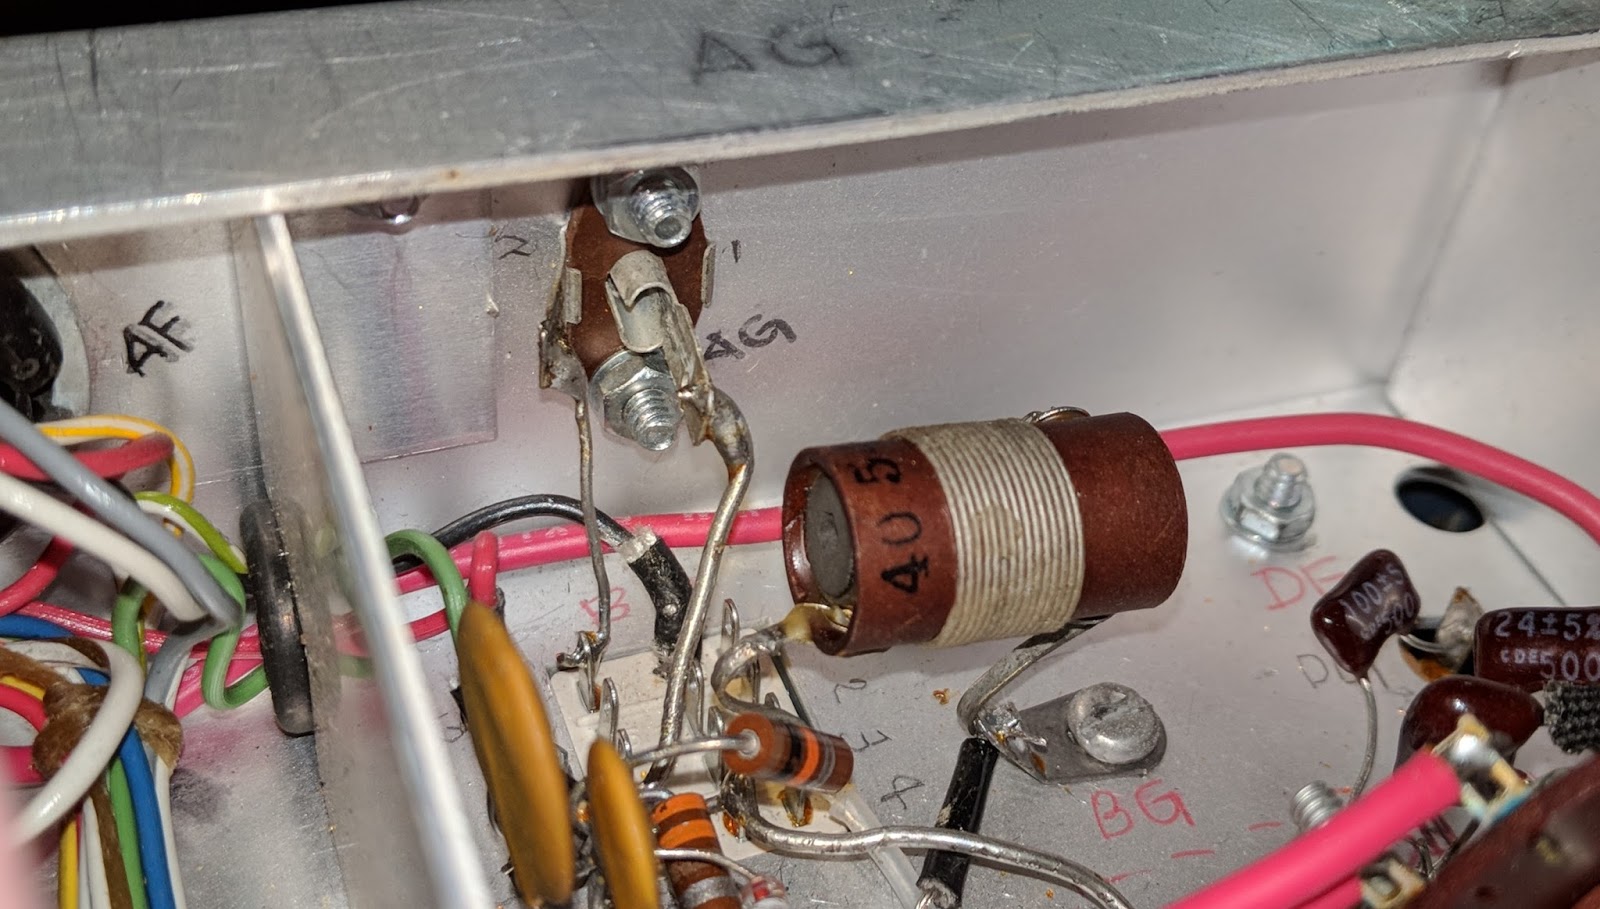
The kit places all the components in the base and the holes that the old big filter capacitors used to be in are now just ventilation. I need to put a wire shield over those holes because high voltages are present just below, as well as some really hot resistors. With the top cover back on it, there shouldn't be a problem but the wire mesh shield is still recommended, especially if it's to be used inside a Heathkit speaker, where the top cover is not used.
With the PCB board, all the components are out of sight in the base except the big resistors
Replaced the HW-101 antenna connector with a BNC
Original antenna connector was a RCA with questionable integrity.
Original RCA antenna jack (viewed from inside chassis)
Replaced with BNC jack which fits without enlarging the original hole.
New antenna jack
The old radio now has power
I replaced the old paper 350v 20uF electrolytic capacitors in the HW-101 and then connected the power cable and switched it on via the switch in the HW-101. I didn't hear any audio at first and thought something was wrong. Silly me, those tubes need a bit to warm up. After a minute I was hearing audio and used the built-in crystal calibrator to check the VFO dial. It was pretty close to spot on.
I ran through some initial checks according to the Heathkit manual. Receive worked well. I listened to some SSB and then dropped down to the 40m CW portion of the band and listened to CW. I waited about 30 minutes for the tubes to warm up. I didn't hear any drift on CW stations I was monitoring.
I found an open frequency, checked the plate current and then tuned up, outputting only about 10 watts because I don't know what state of alignment the finals are in yet. This is the first time I've tuned a tube rig and that was interesting. You have to peak the preselector in receive mode first, then when in tune mode, quickly work back through the preselector, final tune and load levers to peak the RF output. It reads more complicated than it actually is. My OCFD antenna has about a 1.7:1 SWR on 40m so it didn't need much tweaking from the initial settings.
I tuned around and answered N4PGJ, Ron in NY, and had a brief WES exchange. The relay control time set by VOX delay needs to be bumped up a bit as it was dropping between every word break, but other than that it worked like a charm.
I'll make a video soon, but initial impressions are positive. The audio quality was astoundingly good, and the CW filter really did a much better job than I expected. It has a very pleasant sine-wave sidetone rather than the raspy square wave sidetone of my Ten-Tec Century/21. I really think I'm going to enjoy using this old rig.
UPDATE
I got the rig buttoned up and on the desk. Here's a video...
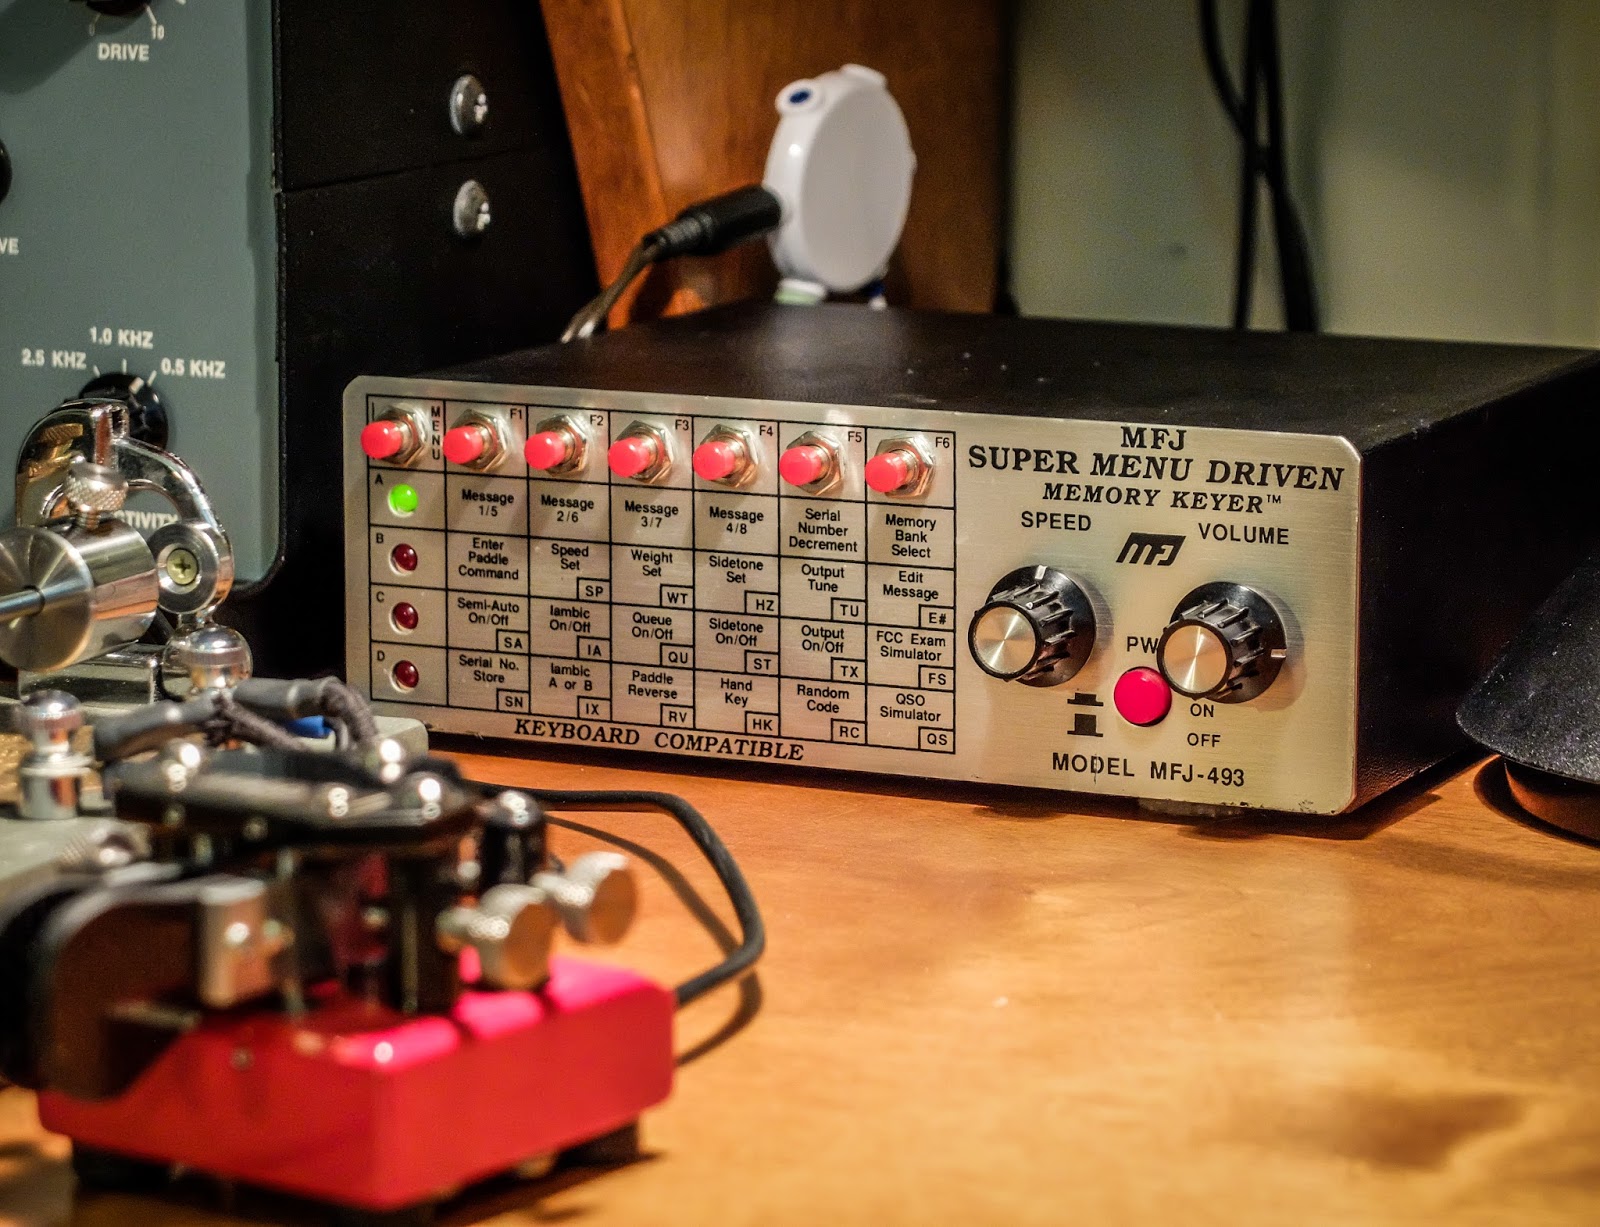
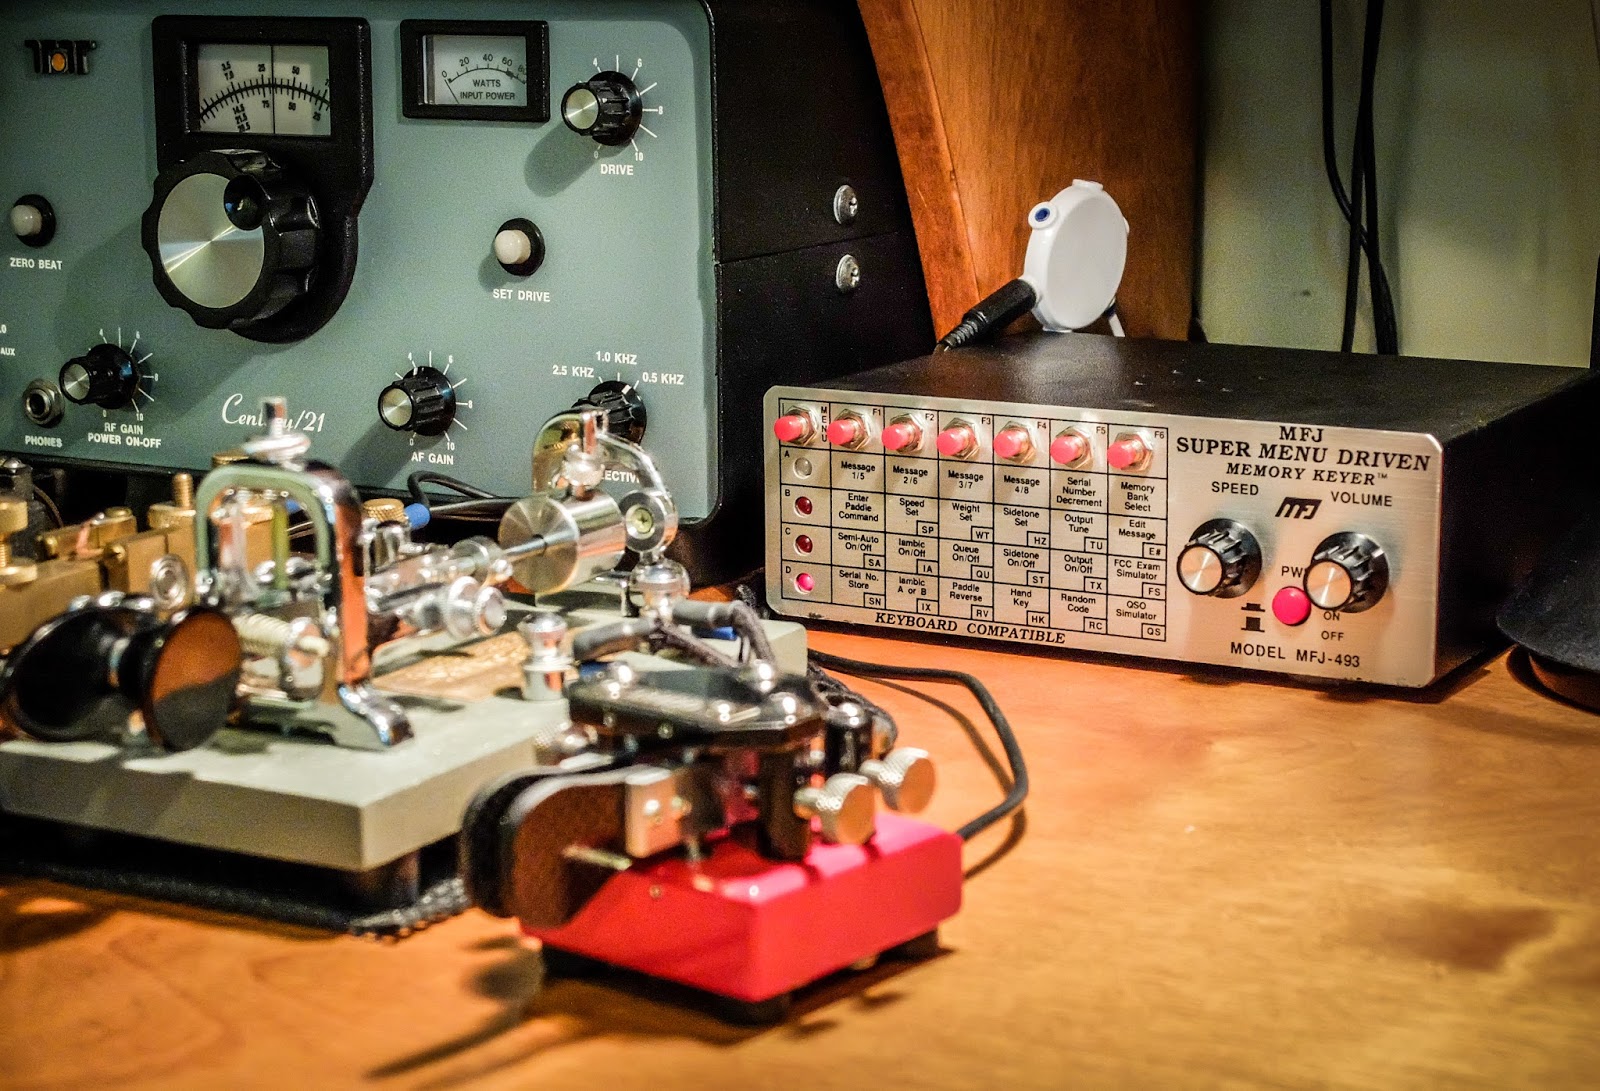
The MFJ-493 has some cool tricks and some not so cool flaws
MFJ-493 "Super" Menu Driven Memory Keyer
Memory keyers do the repetitive and boring stuff
The bands have not been kind in this declining sunspot cycle and I've been sending out my call repeatedly on occasions before receiving a response. I wanted to get a memory keyer to lessen the burden of repeatedly sending my call and to also give me opportunities to do a bit of contesting this year.
If you want a good memory keyer, the K1EL Winkeyer is the natural choice to go with, so of course, I chose to acquire a 23 year old MFJ product instead.
Take the road less traveled and you'll find wonders or fall in a ditch, I always say
The MFJ-493 is no longer sold but you'll frequently see them available used for reasonable prices and MFJ still sells a less featured variant (the MFJ-492).
Memory keyer at the the ready
Features
Typical of many memory keyers the MFJ-493 let's you store messages in up to 8 memories of 4,000 character each using your paddle, an external keyboard plugged into the back or a terminal program via the serial interface. If you make a mistake while entering a message you can send 8-DITS and it will erase the previous word and send the last word in the message so editing is fairly easy. Messages can be constructed from other memories, i.e. you can store your call in Memory #1 and then use "/1" in other messages to reference your call. Repeats and timers are available within the messages as well.
Any of the 8 messages can be sent with the press of a button, although to send messages 4-8 you switch to the second bank of memories.
I won't list all the features because I think they are relatively common across memory keyers and I've posted a link to the manual later in the post, but I will mention that I enjoyed the ability to vary the character AND word spacing sent in messages. So you can create "Farnsworth" type messages that sound (to my ears) far more natural than the typical "squashed" sounding CW sent from most memory keyers. I demonstrate that in the video review. I know a contester would never want to slow down the CW sent from his memory keyer but I have different priorities.
Most of the functions are clearly visible on the front panel so you don't need to refer to the manual to operate most features. Some of the commands are not listed on the front panel so don't totally ignore the manual.
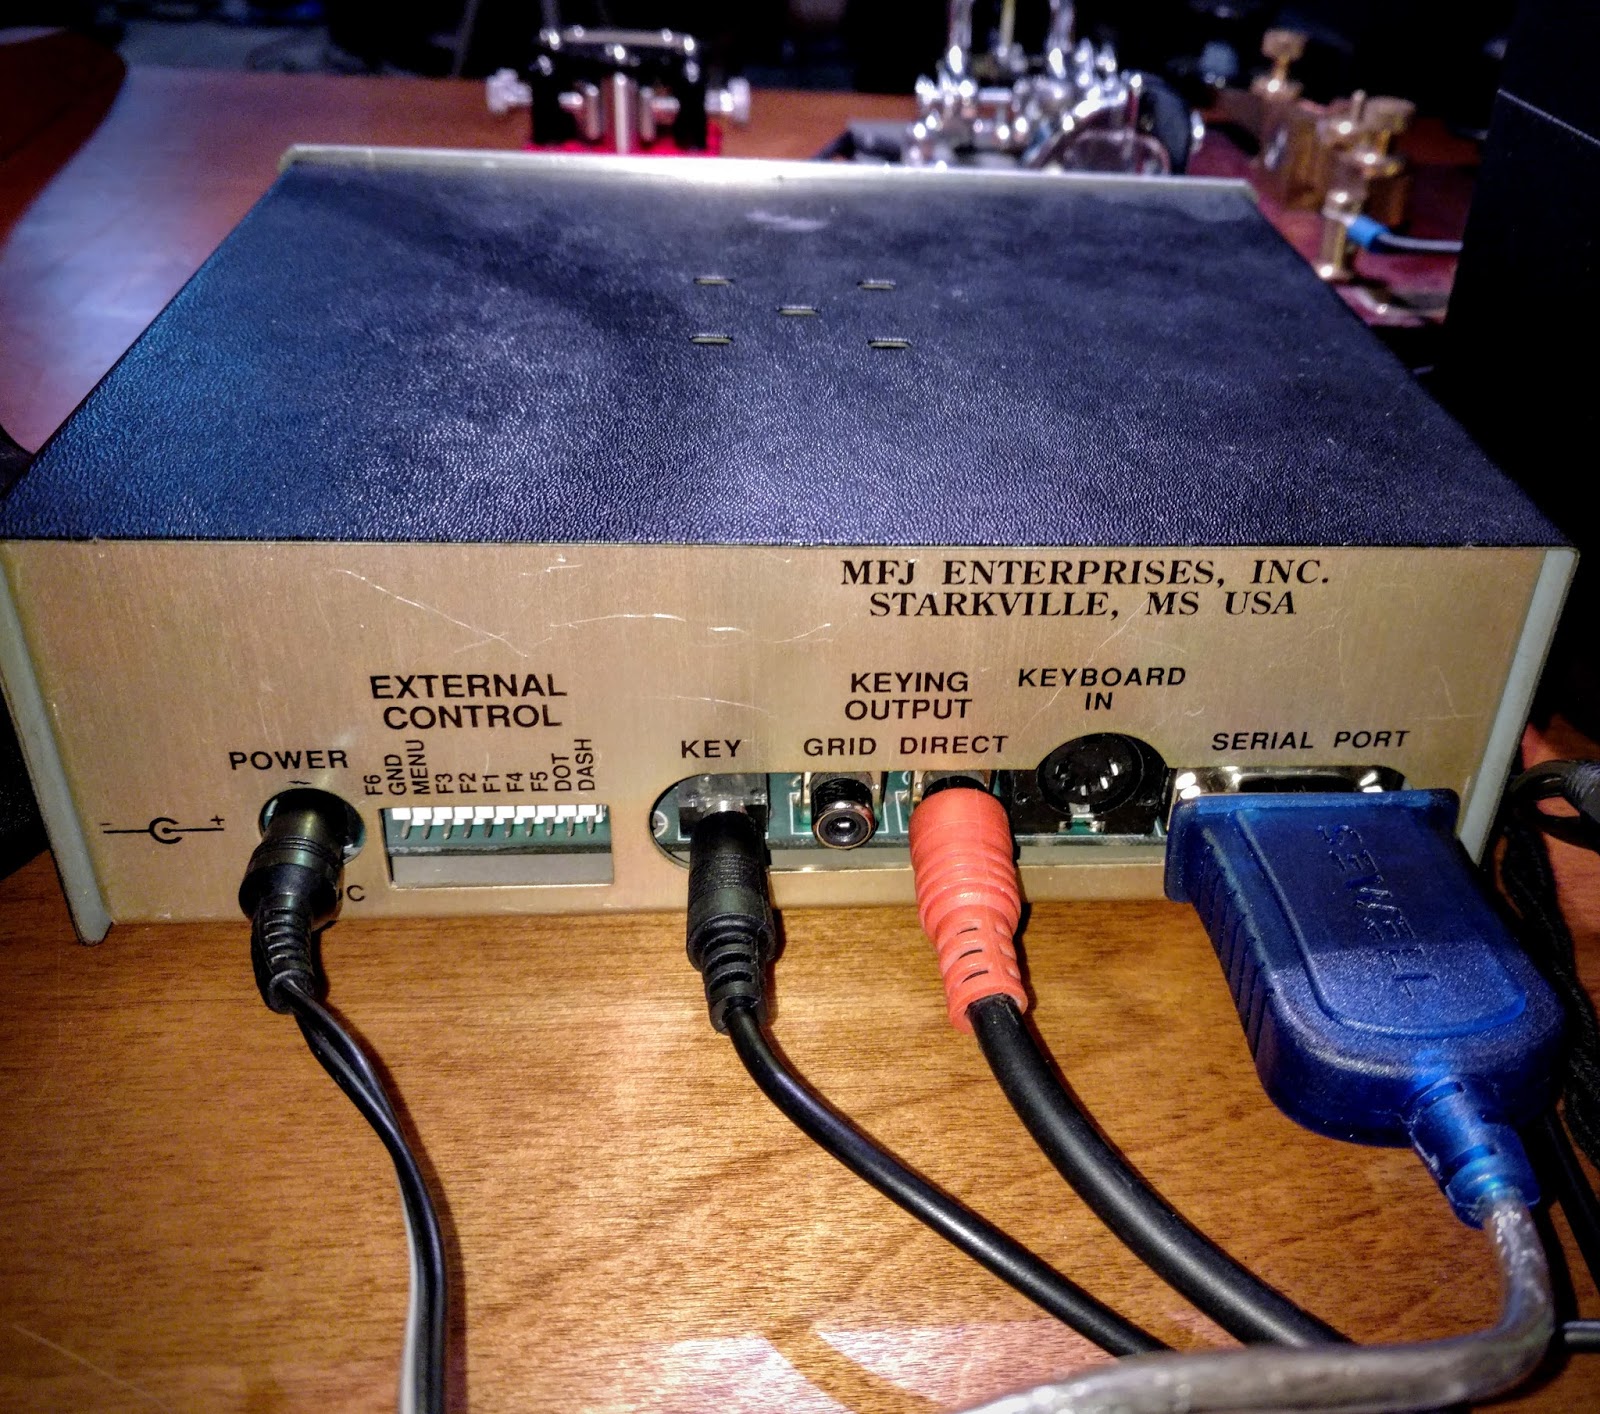
Back panel
The back panel sports a couple interesting ports.. an external keyboard interface and a serial port interface. The external keyboard can of course be used to generate Morse code without a paddle and can make programming memories easier.
The serial port can be used with a terminal emulator like PuTTY set to:
1200 baud
8 data bits
1 stop bit
no parity
xOn/xOff flow control.
If you power up the keyer while it's attached to a terminal emulator you can see some interesting information:
MFJ-493 MEMORY KEYER VERSION 1.1.2C. COPYRIGHT MFJ ENTERPRISES, 1993.
TYPE "[help]" (USING BRACKETS AND LOWER CASE LETTERS) FOR ON LINE HELP INDEX.
[help]
HELP INDEX FOR MFJ-493 MEMORY KEYER
1. TYPE [help-program] FOR HELP ON PROGRAMMING MESSAGES
2. TYPE [help-transmit] FOR HELP ON SENDING MESSAGES
3. TYPE [help-setup] FOR HELP ON CONFIGURING YOUR MFJ-493
4. TYPE [help-list] FOR LIST OF ALL COMMANDS
[help-list]
HELP-LIST INDEX FOR MFJ-493 MEMORY KEYER
[help] LISTS GENERAL TOPICS
[help-program] LISTS MEMORY STORING INSTRUCTIONS
[help-transmit] LISTS TRANSMITTING INSTRUCTIONS
[help-setup] LISTS KEYER SETUP INSTRUCTIONS
[help-list] LISTS ALL COMMANDS
[start#] STARTS KEYER MESSAGE NUMBER # STORAGE ROUTINE
[stop] ENDS KEYER MESSAGE STORAGE ROUTINE
[{#}] MARKS FILE FOR ASCII UPLOAD TO MEMORY
[send#] SENDS MESSAGE NUMBER #
[show#] DISPLAYS MESSAGE NUMBER # CONTENTS
[co] STARTS KEYER COMMAND MODE
Among other commands. There are also commands for printing out the contents of the memories.
So the keyer has a sort of built-in manual if you connect it to a terminal. Very full featured at used prices.
Using a terminal to the keyer via the serial port also displays everything you send with your key as well as allowing keyboard (terminal) input to the memories or allowing you to send code by typing in the terminal emulator.
Lastly regarding commands.. a useful command to know that's not on the front panel, is that you can reset the 493 to factory settings by holding the menu button down while turning it on.
Cool features not seen in other memory keyers
Two functions FCC Exam Practice and QSO Simulator are lots of fun. The FCC Exam practice sends a standard FCC CW exam from back when code was required for license upgrades. It varies up the messages but sends the standard elements required back then. Good for practice.
But the super-cool feature is "QSO Simulator". This mode performs an interactive QSO with you.
Are band conditions getting you down? No one answers your calls? Have a QSO with your keyer!
I'll leave the video to do most of the explaining but basically, the keyer will listen to you send CQ and answer your call and then exchange information with you answering after the turn around. You're expected to get the call it SENDS you correct or it won't answer you back. If you send poor CW it makes raspberry sounds at you. It's just a lot of fun to play around with and copy.
MFJ-493 "QSO Simulator" demonstration
Nits
A couple features that are completely useless are the "hand key" mode and the "semi-automatic-mode". Once the hand-key mode is enabled you can use either paddle as a straight key but it is very unresponsive at anything over 5-10 wpm. So keep your straight key wired into the output of this keyer. Similarly the "semi-automatic" mode is supposed to simulate a bug, where the DITS are sent automatically but the DAHS are manual. Well it's even worse than the hand-key mode, don't bother as it's for entertainment purposes only.
Another problem with this keyer is related to the weighting commands 'C' and 'W'. If you have either of them set to a value other than zero you cannot accurately record a message into memory using the paddles.
I'd hoped to be able to run both my paddle and bug into the input of this keyer and switch it to hand mode when I wanted to use the bug and use it as a bug "de-scratcher" but it doesn't buffer the bug input and in hand key mode misses about a third of the DITS sent by a bug so no joy there. I'll just keep using my old Ham-Keyer as my bug de-scratcher.
MFJ-493 Manual
Many thanks to Paul/N6MGN for sending me a copy of the manual and schematic for this keyer so I could share them.
Adding this additional keyer finally made me break down and build a connection box for all my keys and rigs. I have 4-5 CW keys on my desk at any given time and 3-4 radios. Each of the two external keyers have female RCA jacks for output. The Ham Keyer uses 2 independent 1/4" inputs for straight key and paddle while the MFJ-493 uses a 1/8" stereo plug for the paddle. The Ham Keyer expects the DIT to be the tip of the plug and the MFJ (by default) expects the DIT to be the ring of the plug.
Arrrgh!
To top it off, each of my primary 3 radios expect different wiring from an external keyer.
The Elecraft KX3 needs a 1/8" stereo plug with the ring terminal un-grounded
The TenTec Eagle needs a 1/8" stereo plug with the ring terminal grounded or a mono 1/8"
My TenTec Century/21 needs a 1/4" mono plug (my rig is modified, I believe a stock C21 needs a male RCA
So I took a project box drilled it for 5 phono jacks wired in various configurations for each of the rigs and keyer inputs. I still can't leave the KX3 key plugged in when not in use because when that radio is turned off it presents a high impedance on the plug and makes the C21 think the key is down... (nothing is ever simple) but now I don't have a bunch of 1/4" to 1/8" and stereo to mono plug connectors chained together like a box-cars on a train.
Video review
This video review demonstrates a few of the features and contains the same QSO in the video above at the end...
Summary
The MFJ-493 is a feature rich yet somewhat flawed keyer. For the price I think it's a good buy but don't expect some of the more esoteric functions to work up to your expectations.
That's all for now
So lower your power and raise your expectations... and send your call a couple dozen times using a memory keyer