Showing posts sorted by date for query century/21. Sort by relevance Show all posts

Thursday, March 8, 2018

Oscilloscope now on the bench

Tektronix 475 Oscilloscope and Android Signal Generator App

When I was debugging problems with my Ten-Tec Century/21, and especially my problematic one-watter kit, I needed to see more than DC voltages.  I carried my problem stuff to my friend Paul to see what his scope and signal generator revealed. 

Why would a ham need a scope?  Audio and RF are both AC (alternating current) and a voltmeter alone doesn't offer much insight into that world of voltage across time and phase.

I almost bought an inexpensive digital scope last year, then thought better of it.  Then I almost bought a featured digital scope and checked my wallet and thought better of it. A good digital scope in the 100 Mhz and up range from reliable sources costs upwards of $500.  On the other hand, older professional scopes that have been well maintained and kept in calibration are excellent choices and will last a lifetime.  You do give up handy on screen cursors for measurements, so you have to count divisions by hand and do the math.  You also don't have digital storage in a digital scope, but smart phone cameras and video can make up for that.  

When I saw this recently calibrated Tektronix 475 listed in the classifieds on eHam.net for a nice price, I decided it was time to step into the world of visualized AC.

Watching a capacitor charge 250 times a second
The lines are a bit wide because the signal source was noisy
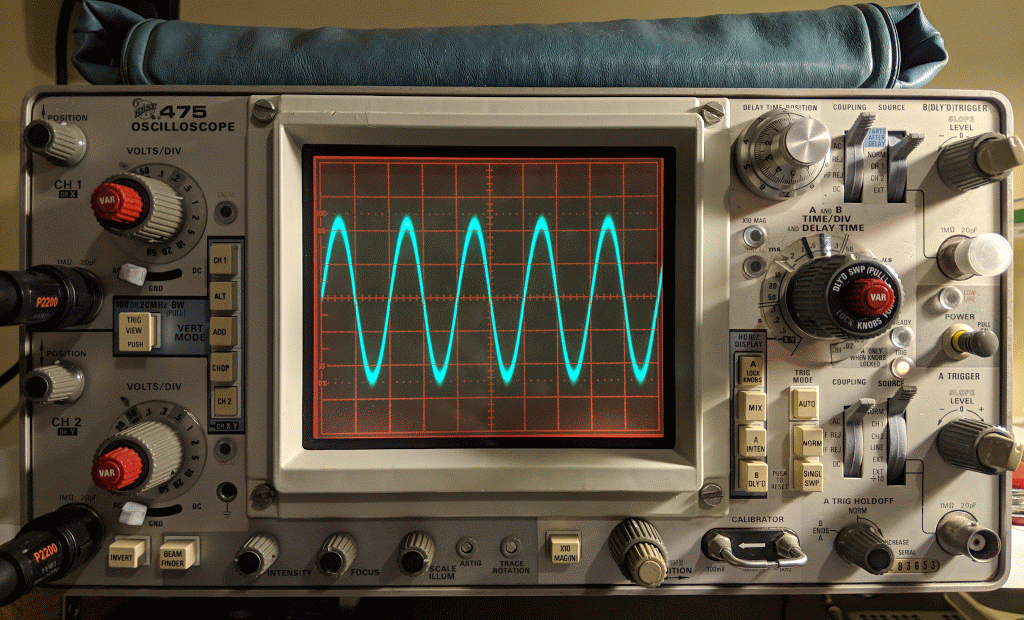
Tek 475 Specs

The Tektronix 475 is a portable (30 lbs), dual-trace oscilloscope with dual time-bases similar to the 465, but with 200 MHz bandwidth and a maximum vertical sensitivity of 2 mV/Div. It is all solid-state except for the CRT. It was introduced in November 1972.  

This scope cost $3,000 when it was new.  Now you can find them in good condition for less than $200.

  • Bandwidth --  200 MHz (475), AC cutoff 10 Hz, switchable BW limit 20 MHz
  • Rise time -- 1.75 ns (475)
  • Deflection -- 2 mV/Div to 5 V/Div, 1-2-5
  • Cascaded mode -- 400 μV/Div, 50 MHz with CH1 input connected to CH2 VERT SIG OUT
  • Time base -- 10 ns/Div to 500 ms/Div, 1-2-5, and ×10 magnifier
  • Input impedance -- 1 MΩ // 20 pF
  • Triggering -- 0.3 Div (int) or 50 mV (ext) to 40 MHz, increasing to 1.5 Div/250 mV at 200 MHz; AC coupling >60 Hz; LF REJ >50 kHz, HF REJ <50 khz="" li="">
  • X bandwidth -- 3 MHz
  • Z axis input -- 5 Vp-p, 50 MHz
  • Calibrator -- 1 kHz, 30 mA / 300 mV square wave
  • Outputs -- CH2 Vert Signal Out, 20 mV/Div into 1 MΩ or 10 mV/Div into 50 Ω; A and B +GATE OUT, +5 V; Probe power jack
  • CRT -- 8 × 10 cm², P31 phosphor (P11 opt.)
  • Power -- 110, 115, 120, 220, 230 or 240 VAC ±10%, 48-440 Hz, max. 100 W

Real knobs and switches

One advantage of an analog scope is that there is a labeled switch or knob for every function. No need to dig through menus to figure out how to do something.  To me this is the a true advantage to finding a well calibrated, analog scope.


An oscilloscope needs a function generator

An scope let's you visualize AC within a circuit, but when you testing  something you often need to inject AC into that circuit.  That's the role played by a function generator.  Function generators allow you to choose a frequency and a wave type (sine, triangle, square, etc.), or sweep across frequencies.

In general, the higher the frequency they support the more they cost.

If you have a mobile device you can get one that uses your headphone jack as output up to 22 kHz for free...


For a free app it is very nice.  It outputs sine waves very well, triangle waves are a bit soft pointed and square waves are for entertainment purposes only.  But it is free so I won't complain.  In the image below you can see the oscillations as it tries to generate a square wave but the audio amplifier of the mobile device just doesn't have that kind of control.

Frequency Generator App set to 1 kHz

Square Wave?

Square waves are not

Reduce the time base to zoom in

Yea, square wave.... not so much

The square wave is bad but sine and triangle waves look good until the frequency get's near the top of the range or the amplitude is raised too high.

Sine Waves look good

Triangle waves are on as well until you go up in frequency


The free app is inadequate for bench testing

While I appreciate that this would be a useful, portable signal generator for testing audio circuits, I'll be ordering a purpose-built function generator because generating clean square waves is an important test signal to be clean.  I also will need a generator that works above audio frequencies, hopefully up the the IF frequencies of the some of the equipment I'm testing.

Only the beginning

Having an oscilloscope is a new adventure for me.  I have another 1-watter kit ready to build that I've been holding off on because I wanted a scope for troubleshooting.  In the meantime I'm using the scope to watch transistors trigger and measure the timing circuits I'm building and learning how to control the scope.  The Tektronix 475 is a feature-rich analog scope.  If you plan to fix your own equipment or do some homebrew electronics work a scope can come in handy.


That's all for now

Sow lower your power and sample it with a scope

72/73
Richard AA4OO

Saturday, February 10, 2018

The Heathkit HW-101 lives again

Ah, the sweet smell of hot tubes and resistors

Heathkit HW-101 after it's first QSO under new ownership

I completed my rebuild of my Heathkit HP-23B power supply this morning.  There was a bit of frustration on my part as I followed the instructions because they only have photos of a HP-23 which has adjustable bias and no LV switch.  

It left me scratching my head a couple times, and I had to locate a schematic of a HP-23B to complete the work.

Heathkit HP-23B Schematic

I really need to learn more about electronics

In the midst of the rebuild I thought I had a problem with the transformer.  Both low voltage winding taps (275v and 350v) showed very low resistance (about 5 Ohms) to chassis ground, which led me to believe there was a short in the transformer.  

I called my mentor in all things Ham radio, Paul AA4XX, and described the issue.  He walked me through the schematic and had me unsolder a couple points to confirm his guess that all was well.  That double tap, low voltage winding presents very low resistance to ground but it is not a short in the world of AC.  I continue struggling to wrap my head around the differences in AC and DC, but I'm slowly learning and fortunately haven't caught anything on fire yet.

Out with the old, in with the new

Old components

Testing High Voltage

My Multi-meter can only measure up to 600v, so in order to measure the 800v output I used two 3 watt 100 kOhm resistors in series as a voltage divider.  When in use, the MM will read half the voltage.

Voltage divider for measuring the high-voltage output
With the voltage divider the HV power measured 401v which works out to 802v undivided

Completed upgrade


The kit places all the components in the base and the holes that the old big filter capacitors used to be in are now just ventilation.  I need to put a wire shield over those holes because high voltages are present just below, as well as some really hot resistors.  With the top cover back on it, there shouldn't be a problem but the wire mesh shield is still recommended, especially if it's to be used inside a Heathkit speaker, where the top cover is not used.

With the PCB board, all the components are out of sight in the base except the big resistors

Replaced the HW-101 antenna connector with a BNC

Original antenna connector was a RCA with questionable integrity.

Original RCA antenna jack (viewed from inside chassis)

Replaced with BNC jack which fits without enlarging the original hole.

New antenna jack

The old radio now has power 

I replaced the old paper 350v 20uF electrolytic capacitors in the HW-101 and then connected the power cable and switched it on via the switch in the HW-101.  I didn't hear any audio at first and thought something was wrong.  Silly me, those tubes need a bit to warm up.  After a minute I was hearing audio and used the built-in crystal calibrator to check the VFO dial.  It was pretty close to spot on.

I ran through some initial checks according to the Heathkit manual.  Receive worked well.  I listened to some SSB and then dropped down to the 40m CW portion of the band and listened to CW.  I waited about 30 minutes for the tubes to warm up.  I didn't hear any drift on CW stations I was monitoring.

I found an open frequency, checked the plate current and then tuned up, outputting only about 10 watts because I don't know what state of alignment the finals are in yet.  This is the first time I've tuned a tube rig and that was interesting.  You have to peak the preselector in receive mode first, then when in tune mode, quickly work back through the preselector, final tune and load levers to peak the RF output.  It reads more complicated than it actually is.  My OCFD antenna has about a 1.7:1 SWR on 40m so it didn't need much tweaking from the initial settings.

I tuned around and answered N4PGJ, Ron in NY, and had a brief WES exchange.  The relay control time set by VOX delay needs to be bumped up a bit as it was dropping between every word break, but other than that it worked like a charm.

I'll make a video soon, but initial impressions are positive.  The audio quality was astoundingly good, and the CW filter really did a much better job than I expected.  It has a very pleasant sine-wave sidetone rather than the raspy square wave sidetone of my Ten-Tec Century/21.  I really think I'm going to enjoy using this old rig.

UPDATE

I got the rig buttoned up and on the desk.  Here's a video...


Oldie but goodie


That's all for now

So lower your power and warm up those tubes.

72/73
Richard AA4OO

Saturday, January 27, 2018

Before transistors there were TUBES

Oh Boy, what have I gotten myself into

TUBES

A few months after re-entering the hobby in 2015 I picked up a TenTec Century/21.  It has been one of my favorite radios to operate and it is the most aesthetically pleasing radio I own.  After working with it's older (circa 1977) discrete transistorized technology and debugging some of it's problems, I became interested in building kits to learn about electronics.  I built a number of radio kits from different sources and some of the mini-module kits from Elecraft.

But I kept wondering about tube radios.  I came to the hobby well past the tube radio era and although I've read a lot about valve technology I didn't have any first hand experience.  I kept watching auctions for old Heathkits and Military radios and even bid on a few but lost the bids.

This past Christmas I decided that in 2018 I'd do something about this lingering interest.  I knew I'd eventually want to operate one mobile because, well that would certainly make it harder.  The power requirements of tubes are orders of magnitude greater than the QRP transistorized rigs I'd purchased.  Not knowing what I was doing I figured I could re-work an old Heathkit HP-13 power supply to give me what I'd need for an old military radio like the GRC-9.  

Heathkit HP-13a

Unsurprisingly, I was the only bidder and got one for $30 along with the odd grove power connectors that it uses. But I didn't do my research, and soon learned that the magic for these high voltage power supplies lies in the very specific design of their transformers.  In the case of the HP-13 it is operated much like an old military vibrator power supply with two germanium transistors acting as the vibrator.  Current is applied to to the core until it saturates and then a specific voltage determined by the number of turns is generated, the saturation drops the current to that winding and it starts over with the other transistor and the other winding.  I couldn't easily, or practically lower the 800v high voltage down to 580v required by the military radio I wanted and even the low voltage windings produce 300v and 250v respectively which is far beyond the 105v needed by the military radio.

I was warned off actually purchasing a military vibrator power supply due to a number of issues so I decided I'd start out with the radio this supply was designed for, a Heathkit HW-101.  All the electrolytic capacitors have to be replaced, and I plan to replace the diodes to be on the safe side as well.  I'm hoping the old transistors are still serviceable as I can't find any information on direct replacements for those.  I've ordered the replacement caps, diodes and resistors so I'll see how my refurb of this old power supply works out.  Working with voltages that can kill me is a bit daunting and I'm being very careful with the limited power-up tests I've performed so far.

Heathkit HW-101


That brings me to the newest arrival.  If you read my blog you know I like to do photography and it's no fun to photograph ugly radios so I kept watching auctions for HW-101s that were in good cosmetic condition.  I knew I'd have to do a good bit of refurbishment on whatever I ended up with but at least I could start with a "looker".

Heathkit HW-101
I plan, of course, to use it primarily for CW.  I'm aware that this radio is NOT particularly pleasant for CW due to the clacking relay as well as the poor filtering, but I've gotten accustomed to hearing lots of CW stations at once while working with my Century/21 so I think I can adapt.  All my other radios have full break-in so this will be a challenge to deal with, but I'm up to seeing what it was like for old time hams.

Crystal filter
While it has a crystal filter, 6dB of filtering at 400Hz will not offer much rejection to the out of band signals.  I guess I'll see. 

Admittedly this is far from QRP radio but I will endeavor to operate mobile at least a few times just for the experience.  I plan to operate at QRP levels to the extent I'm able.  There's just so much for me to learn.

If I don't maim myself or burn my house down, be on the lookout for posts as I resurrect the power supply and the old girl and get it on the air.  I have some ideas for photography involving glowing tubes that I think will be fun to figure out.  My bigger challenge is that I have no room for this thing at my operating position, so I'm trying to figure that out as well.

So drop me a line if you have restoration experience with these rigs.  Of course I'm reading what I can and look forward to learning how to align the transmit tubes and all the things I've had absolutely no experience with in the world of transistorized radios.


That's all for now

So warm up your tubes and raise your expectations

72/73
Richard AA4OO

Saturday, December 30, 2017

Don't forget -- Straight Key Night 2018 is tomorrow !

Straight Key Night -- 2018

Don't forget January 1st, 2018 starting 00:00 GMT (7pm EST Dec 31) is the start of Straight Key Night 2018.  Bring your tired, old equipment on-air and mash your favorite mechanical key.  This is not a contest, just an opportunity to make lots of fun QSOs.

I'll be on the air with my 1977 Century/21 using my Junker Straight key and Standard Vibroplex Bug.


ARRL has details on their website... http://www.arrl.org/straight-key-night

Video from 2018 SKN

If you hang in there until the 2:08 mark you'll see my new, spiffy, dual camera angle recording method that I plan to use in all my videos.


So, lower your power, and raise your expectations...

72/73
Richard AA4OO

Tuesday, November 14, 2017

Thank you for my signal report

3 numbers can mean a lot


QRP operators strive to make the most out of a little.  So when we receive a signal report it means a lot to us.  But the common signal report, given using the R-S-T System, seems often to be misunderstood by some amateur radio operators.

RST has 3 elements:
  • R stands for Readability.  How easy or difficult is it to copy the characters or words being sent on a scale from 1 to 5, with 1 meaning unreadable ranging up to 5 meaning perfectly copy-able.
  • S stands for Signal Strength.  How strong is the signal on a scale from 1 to 9, with 1 being barely perceptible up to 9, being extremely strong.
  • T stands for Tone.  This is only used to describe a CW signal's tone.  Given modern transceivers there are few cases where you'd send anything other than a 9 meaning perfect tone, devoid of ripple or modulation. You'll rarely hear a report with a Tone report other than 9, but if you hear ripple or modulation artifacts you may send lower numbers but it will likely just confuse the other operator.  If you hear chirp (a rising or falling tone) you may wish to append a 'C' to the RST to indicate that.
I want to concentrate on Readability and Signal strength.

Readability

I believe most of us are guilty of focusing on the signal strength portion of the report rather than readability.  But readability can convey a lot to the operator receiving the report.  

For instance if you have a lot of local noise or if the band is noisy due to magnetic disturbance or there's QRM or QRN readability may be difficult.  Similarly, if the operator is using poor technique and running letters or words together that affects readability.

It's possible that signal strength may be good or even moderately strong (6 or 7) but for some reason copy is difficult.  It would be worthwhile to send a 2 (Barely readable, occasional words distinguishable) or a 3 (Readable with considerable difficulty) for the 'R' portion of the signal report as in 359.  Then follow up with WITH QRM or WITH POOR SPACING, to make the other operator aware that you're having trouble copying.

I will occasionally have an operator send me a 3 for R but it seems to always be related to low signal strength.  If someone sends you a 3 or a 4 and it's not followed by an equally low signal strength number inquire as to the difficulty in readability.  It may be something you can correct on your end.

Signal

Signal seems obvious but it's not.  

I believe that many operators use the reading on their S-meter to report the Signal strength but different manufacturers calibrate their S-meters quite differently. The difference between S-units is supposed to be 6 dB but that's often not the case.  On many rigs the use of the preamp or the attenuator also effects the displayed S-meter reading.  So the S-meter is not an accurate reflection of what Signal strength is supposed to convey.  

My old Ten-Tec Century/21 doesn't even have an S-meter.  Neither do my homebuilt QRP radios.

So, what should we be using?  Well how about the actual meaning of the system:
  1. Faint—signals barely perceptible
  2. Very weak signals
  3. Weak signals
  4. Fair signals
  5. Fairly good signals
  6. Good signals
  7. Moderately strong signals
  8. Strong signals
  9. Extremely strong signals
Obviously this is a subjective report, but on my KX3 my S-meter may read 2 when the signal actually sounds Good (6), so I send a 6 even though the meter reads 2.  If I were to send the other station the S-meter reading of 2 they'd assume I'm barely copying them, because I sent them a 529.

I think you can start to see the point.  Use the system as it was designed, before radios had S-meters and the Signal report will have more meaning to the station receiving the report.

My Ten-Tec C21 doesn't have an S-meter but it does have AF and RF gain controls.  I will commonly run my AF gain at a high level and use the RF gain to control the volume of the received signal.  This increases the SNR (signal to noise) and gives me a relative gauge of how strong the sender is.  If I have my RF gain turned all the way down and still clearly hear the other station they have an extremely strong signal (9).  If I have to turn my RF gain all the way up just to copy then the signal is very weak, or faint (2 or 1).  In between those extremes I offer a relative report based on the signal strength  I  am hearing.

So, use the system as it was intended

So, reconsider how you give a signal report.  Think about the original intent of the R-S-T System and you'll be conveying far more information in your report that may help the other station know for certain how they are being heard.

I start most QSOs at QRP levels.  If the other station sends me a report that is below a 5 in readability or a signal strength 5 or below I change antennas or raise power, if I'm able, to make their copy of my station more pleasurable, but if they send me a 599 when they are barely copying me or losing me in QSB then how can I know to make a change?

Maybe this is a radical idea but for my own operation I will strive to start sending more accurate reports and help the other station truly know how they are being copied.


That's all for now...

So lower your power and raise your expectations

72/73
Richard, AA4OO

Thursday, November 2, 2017

2B Radio Parts replacement bumpers for Vibroplex keys

Rubber baby buggy bumpers

Sometimes I needlessly struggle with a problem because I'm cheap.

My Vibroplex Vibrokeyer was manufactured in 1960.  My Vibroplex Bug was manufactured in the mid 1970s.  In both cases the once flexible, non-skid rubber feet have since turned to hardened rubber fossils. In order to use the keys without them skating all over the desk I employ a variety of non-skid solutions, except for the obvious.

For some reason I seem to have to move stuff on my desk all the time.  I guess I'm never content and constantly reorganize the station and accessories.  Inevitably I misplace a rubber mat or some rubberized shelf liner sticks out from under a key in an unsightly manner. In general it makes the station look shoddy.

Fossil feet on a 1960 Vibroplex Vibrokeyer

Bring out the buggy bumpers


Enter '2B Radio Parts'.  

2B Radio Parts, provide replacement parts for Bugs, paddles for various makes of keys.  I ordered Replacement Vibroplex Bumpers (6 Bumper Pack).  I wasn't aware the 'feet' were called 'bumpers', but there you have it... I have new rubber baby buggy bumpers for my bug and vibrokeyer.


The 6 bumper pack replaced the feet on both keys.  In case you never noticed, many keys, including those made by Vibroplex, have 3 feet rather than 4.  It keeps the key from rocking on a surface that isn't entirely level or flat.

Parts is Parts

The replacement feet... err... bumpers from 2B, fit fine. They were nearly an exact match for the old feet on the 1970s bug but were a smidge taller and slightly different design than those on the 1960 Vibrokeyer.  The older key had a chambered, internal design that I'd guess had a bit more cushion back when it was new.  57 years later, the rubber foot is a brittle relic of its former self.

new bumper left, 1960 Vibrokeyer bumper right


new bumper left, 1960 Vibrokeyer bumper right

Ahhh, no more slip siding away

The old feet are simply held on by countersunk machine screws and the receiving holes in the new bumpers fit without a hitch.

Shod with new boots, shoes, feet, bumpers, whatever


My Vibroplex Bug has a more solid disposition as well now


The moral of the story is stop being cheap and buy some new feet!


That's all for now...  

So lower your power and raise your expectations

P.S.   Oh, speaking of which (lowering your power and raising expectations)... I was sending out my call on 7030 unsuccessfully a couple nights ago, for about 10 minutes.  I was using my TenTec Century/21 at 5 watts QRP and getting lousy spots on RBN (6 to 9dB SNR).  I decided to keep sending CQ a couple more minutes and was finally answered by S51MF, Franz in Slovenia, 4700 miles away.  You just never know what your QRP signal is going to net you.

72/73
Richard, AA4OO

http://hamradioqrp.com

Tuesday, October 10, 2017

CW tone comparison C21 to KX3

The old ways are sometimes best

This is a short one.  I haven't found much time lately to enjoy the hobby, but the past few evenings I've been firing up the old Ten-Tec Century/21 and just listening to CW while I tend to other duties.   Tonight, I managed to find time before dinner to have a brief ragchew with fellow SKCC member WV8DH (Dave in West Virginia) using my old rig.  It reminded me how much I enjoy the sound of CW coming out of that radio.


I was too lazy to set the camera up to capture the QSO, but after the QSO I dropped down the band to find a good ragchew going on and grabbed my smartphone and shot a quick comparison of the CW tone presented by the 40 year old TenTec radio and my new, modern, Elecraft KX3. 

After listening to the video I realize that a lot of wonderful sound, including harmonics are not captured by the microphone on the phone and can't be heard in the video.  Nonetheless, I think you'll agree that the older rig has finer CW audio. It's certainly more pleasant to listen to for long stretches.  The KX3 audio still wears me out if I operate more than an hour.  I wrote a detailed post comparing the KX3 to the Ten-Tec Eagle last year that pointed out what I believe the culprit of the tainted audio on the KX3.  The Eagle is presently off the desk and if anything the older Ten-Tec Century/21 sounds even better than the newer Ten-Tec Eagle.

But here's the brief, badly made smartphone video comparison of the C21 and the KX3...

Comparing CW tone from TenTec C21 to a modern Elecraft KX3

That's all for now.  I'm going to be reviewing a nice bug that a friend has loaned me soon.

That's all for now...

So lower your power and raise your expectations

72/73 Richard  AA4OO

Wednesday, January 25, 2017

Hard fought SKCC QSO using the Ten-Tec Century/21

Sometimes you need to move your QSO

My ever changing station configuration
Left to right - Elecraft KX3, Ten-Tec Century/21 with Ten-Tec Eagle on top, the MFJ 493 keyer on the right
4 keys - Navy Flameproof, Kent Hand Key, Vibroplex Bug, N3ZN QRP paddle
The Elecraft AF1 audio filter is sitting unused in front of the Century/21
After starting our QSO the ARRL QST program started right on top of us causing QRM that forced us to move to another frequency
My old Ten-Tec Century/21 is a lot of fun to use and its direct conversion receiver makes CW sound beautiful. But the frequency dial is fairly imprecise so when I asked the station to QSY up 1kHz finding him again was a bit of a challenge.  When I heard him I had to zero-beat him again to make sure I was on the correct side of the direct conversion receivers passband.

Enjoy the QSO and the QRM dodging...


Shooting this video

This video was a bit harder to shoot than what I normally do.  I usually place my camera to one side but I wanted to use my fisheye lens and shoot the QSO from above.  

While shooting I was straddling the tripod with the camera right in front of my face so I was reaching around the tripod to use my keys and get to my keyboard for logging.  It was a bit awkward, and in the video you'll see me bump the VFO while trying to operate the radio because I couldn't really see what I was doing.  It's always fun to add a level of difficulty while making these videos.


That's all for now...

So lower your power and raise your expectations

72/73
Richard AA4OO


Saturday, January 21, 2017

Quirky Keyer - The MFJ-493

The MFJ-493 has some cool tricks and some not so cool flaws

MFJ-493 "Super" Menu Driven Memory Keyer

Memory keyers do the repetitive and boring stuff

The bands have not been kind in this declining sunspot cycle and I've been sending out my call repeatedly on occasions before receiving a response.  I wanted to get a memory keyer to lessen the burden of repeatedly sending my call and to also give me opportunities to do a bit of contesting this year.

If you want a good memory keyer, the K1EL Winkeyer is the natural choice to go with, so of course, I chose to acquire a 23 year old MFJ product instead.   

Take the road less traveled and you'll find wonders or fall in a ditch, I always say

The MFJ-493 is no longer sold but you'll frequently see them available used for reasonable prices and MFJ still sells a less featured variant (the MFJ-492).

Memory keyer at the the ready

Features

Typical of many memory keyers the MFJ-493 let's you store messages in up to 8 memories of 4,000 character each using your paddle, an external keyboard plugged into the back or a terminal program via the serial interface.  If you make a mistake while entering a message you can send 8-DITS and it will erase the previous word and send the last word in the message so editing is fairly easy.  Messages can be constructed from other memories, i.e. you can store your call in Memory #1 and then use "/1" in other messages to reference your call.  Repeats and timers are available within the messages as well.

Any of the 8 messages can be sent with the press of a button, although to send messages 4-8 you switch to the second bank of memories.

I won't list all the features because I think they are relatively common across memory keyers and I've posted a link to the manual later in the post, but I will mention that I enjoyed the ability to vary the character AND word spacing sent in messages.  So you can create "Farnsworth" type messages that sound (to my ears) far more natural than the typical "squashed" sounding CW sent from most memory keyers.  I demonstrate that in the video review.   I know a contester would never want to slow down the CW sent from his memory keyer but I have different priorities.

Most of the functions are clearly visible on the front panel so you don't need to refer to the manual to operate most features.  Some of the commands are not listed on the front panel so don't totally ignore the manual.

Back panel
The back panel sports a couple interesting ports.. an external keyboard interface and a serial port interface.  The external keyboard can of course be used to generate Morse code without a paddle and can make programming memories easier.

The serial port can be used with a terminal emulator like PuTTY set to:

  • 1200 baud
  • 8 data bits
  • 1 stop bit
  • no parity
  • xOn/xOff flow control.


If you power up the keyer while it's attached to a terminal emulator you can see some interesting information:
MFJ-493 MEMORY KEYER VERSION 1.1.2C.        COPYRIGHT MFJ ENTERPRISES, 1993.
TYPE "[help]" (USING BRACKETS AND LOWER CASE LETTERS) FOR ON LINE HELP INDEX.
[help]
HELP INDEX FOR MFJ-493 MEMORY KEYER
1.  TYPE [help-program] FOR HELP ON PROGRAMMING MESSAGES
2.  TYPE [help-transmit] FOR HELP ON SENDING MESSAGES
3.  TYPE [help-setup] FOR HELP ON CONFIGURING YOUR MFJ-493
4.  TYPE [help-list] FOR LIST OF ALL COMMANDS
[help-list]
HELP-LIST INDEX FOR MFJ-493 MEMORY KEYER
[help]           LISTS GENERAL TOPICS
[help-program]   LISTS MEMORY STORING INSTRUCTIONS
[help-transmit]  LISTS TRANSMITTING INSTRUCTIONS
[help-setup]     LISTS KEYER SETUP INSTRUCTIONS
[help-list]      LISTS ALL COMMANDS
[start#]         STARTS KEYER MESSAGE NUMBER # STORAGE ROUTINE
[stop]           ENDS KEYER MESSAGE STORAGE ROUTINE
[{#}]            MARKS FILE FOR ASCII UPLOAD TO MEMORY
[send#]          SENDS MESSAGE NUMBER #
[show#]          DISPLAYS MESSAGE NUMBER # CONTENTS
[co]             STARTS KEYER COMMAND MODE
Among other commands.  There are also commands for printing out the contents of the memories.
So the keyer has a sort of built-in manual if you connect it to a terminal.  Very full featured at used prices.

Using a terminal to the keyer via the serial port also displays everything you send with your key as well as allowing keyboard (terminal) input to the memories or allowing you to send code by typing in the terminal emulator.

Lastly regarding commands.. a useful command to know that's not on the front panel, is that you can reset the 493 to factory settings by holding the menu button down while turning it on.


Cool features not seen in other memory keyers

Two functions FCC Exam Practice and QSO Simulator are lots of fun.  The FCC Exam practice sends a standard FCC CW exam from back when code was required for license upgrades.  It varies up the messages but sends the standard elements required back then.  Good for practice.

But the super-cool feature is "QSO Simulator". This mode performs an interactive QSO with you.

Are band conditions getting you down?  No one answers your calls?  Have a QSO with your keyer!

I'll leave the video to do most of the explaining but basically, the keyer will listen to you send CQ and answer your call and then exchange information with you answering after the turn around.  You're expected to get the call it SENDS you correct or it won't answer you back.  If you send poor CW it makes raspberry sounds at you.  It's just a lot of fun to play around with and copy.

MFJ-493 "QSO Simulator" demonstration


Nits

A couple features that are completely useless are the "hand key" mode and the "semi-automatic-mode".   Once the hand-key mode is enabled you can use either paddle as a straight key but it is very unresponsive at anything over 5-10 wpm.  So keep your straight key wired into the output of this keyer.  Similarly the "semi-automatic" mode is supposed to simulate a bug, where the DITS are sent automatically but the DAHS are manual.  Well it's even worse than the hand-key mode, don't bother as it's for entertainment purposes only.

Another problem with this keyer is related to the weighting commands 'C' and 'W'.  If you have either of them set to a value other than zero you cannot accurately record a message into memory using the paddles.

I'd hoped to be able to run both my paddle and bug into the input of this keyer and switch it to hand mode when I wanted to use the bug and use it as a bug "de-scratcher" but it doesn't buffer the bug input and in hand key mode misses about a third of the DITS sent by a bug so no joy there.  I'll just keep using my old Ham-Keyer as my bug de-scratcher.

MFJ-493 Manual

Many thanks to Paul/N6MGN for sending me a copy of the manual and schematic for this keyer so I could share them.

View manual
Download manual

View Schematic
Download Schematic

So many connections

Adding this additional keyer finally made me break down and build a connection box for all my keys and rigs.  I have 4-5 CW keys on my desk at any given time and 3-4 radios.  Each of the two external keyers have female RCA jacks for output.  The Ham Keyer uses 2 independent 1/4" inputs for straight key and paddle while the MFJ-493 uses a 1/8" stereo plug for the paddle.  The Ham Keyer expects the DIT to be the tip of the plug and the MFJ (by default) expects the DIT to be the ring of the plug.

Arrrgh!

To top it off, each of my primary 3 radios expect different wiring from an external keyer.  
  • The Elecraft KX3 needs a 1/8" stereo plug with the ring terminal un-grounded
  • The TenTec Eagle needs a 1/8" stereo plug with the ring terminal grounded or a mono 1/8"
  • My TenTec Century/21 needs a 1/4" mono plug (my rig is modified, I believe a stock C21 needs a male RCA
So I took a project box drilled it for 5 phono jacks wired in various configurations for each of the rigs and keyer inputs.  I still can't leave the KX3 key plugged in when not in use because when that radio is turned off it presents a high impedance on the plug and makes the C21 think the key is down...  (nothing is ever simple) but now I don't have a bunch of 1/4" to 1/8" and stereo to mono plug connectors chained together like a box-cars on a train.


Video review

This video review demonstrates a few of the features and contains the same QSO in the video above at the end...


Summary

The MFJ-493 is a feature rich yet somewhat flawed keyer.  For the price I think it's a good buy but don't expect some of the more esoteric functions to work up to your expectations.


That's all for now

So lower your power and raise your expectations... and send your call a couple dozen times using a memory keyer

72/73
Richard AA4OO

Sunday, January 8, 2017

My TenTec Eagle sounds better than my Elecraft KX3

Your eardrums will thank you

Coming back to the hobby in 2015 I re-entered as a CW / QRP operator and I searched for a good QRP radio.  The Elecraft KX3 certainly qualified and it has been a great radio to use, especially when portable.

Elecraft KX3 -- stellar radio for portable QRP operations

But a few months after getting my KX3 an old TenTec Century/21 found it's way onto my desk and through numerous blog entries you may note that for some reason I kept gravitating to use it rather than my KX3 when I operated from the shack, even though the KX3 beats the old C21 technically in absolutely EVERY regard.  I just enjoyed operating CW with the old radio more than the KX3. I couldn't explain why.

Fast forward to late March of 2016.  I purchased a used TenTec Eagle from my friend AA4XX and began using it as my primary radio when I wasn't portable.   Here again the KX3 trumps the Eagle in nearly every technical aspect and offers dozens more features.  I just kept gravitating to use the TenTec radios rather than the Elecraft.

I used the my KX3 for Field Day in 2016 and after I packed up and brought it home the KX3 stayed in my backpack and only came out for portable outings.  It did not go back on my desk.  The KX3 cried little electronic tears while the Eagle gloated...

Ten-Tec Eagle -- compact / simple HF transceiver

Why no love for the KX3?

Time passed, and over the new year break I got to thinking about what I missed about having my KX3 on the desk; like its RX/IQ output for HDSDR and the ease working DX splits using it's dual watch capability and it's integration to logging applications like the ability to trigger CW macros from my logging software.  The list of "nice-stuff" goes on and on since the KX3 contains multiple kitchen sinks...  So I re-organized my desk to make room for the KX3 again and operated with it exclusively over the past few days...

I was getting ear fatigue and my ears rang in the evenings.  This was not the sort of ringing in the New Year that I wanted. I had been previously operating the same amount with the Eagle over the past month without the earaches.  Something was amiss.

Had I finally discovered why I keep going back to my TenTec radios?

Audio, Audio, Audio

So over time, even when I switched back and forth between radios there was a subtle "ouch" occurring when I used the KX3.  I enjoy CW and digging out weak signals can be fun... or it can be painful.  I guess when I sat down to use a radio and my hand hovered between the "Oh-so-feature-rich" KX3 and the "Nice-personality" Eagle my brain was saying "choose the nice personality" you're happier that way.

But there was a underlying reality to the choice I was making.

Just the facts mam

I used an audio frequency analyzer to capture audio from each radio by sandwiching the microphone in my headphones.  It hears what I would hear.  And the graphs tell a tale.

Below is one graph for each radio.  The RED graph line in each chart is the averaged "peaked" frequency output audio during the same QSO.  Ignore the green line as it was just the instantaneous  audio at the time I froze the display between takes.  The CW sidetone on each radio is set to 620Hz.

I re-ran this capture for each radio a few times during a lengthy ragchew between two stations.  The signal strength was around S5-S7.  It wasn't a strong signal which is typical of what I work, especially as the Solar cycle winds down.

I tried the captures with and without noise reduction on each radio.  The RF was rolled off as evenly as I could determine for each and both were set to a DSP filter bandwidth of approximately 400Hz.  Both radios were using the same antenna and everything was as similar as I make it.  RCVR EQ was set flat for the KX3.


Elecraft KX3 CW audio (ignore green graph line)
Ten-Tec Eagle CW audio (ignore green graph line)

The CW audio output from each of the two radios is distinctive

KX3 audio demonstrates
shoulder noise
Eagle has clean audio
There's clearly a CW signal peak around 620Hz in each radio but the KX3 shows a significant shoulder of audio just 9dB down from the peak below the center frequency 

Whereas the Eagle has a clear peak presenting a narrow tone range at the sidetone pitch with narrow shoulders down to the filter width.


Confirmation of my subjective tests

When I saw this I literally said "Aha!"   

This confirmed what my ears and my subconcious had been telling me.  The KX3 is more fatiguing to listen to than the Eagle because it presents more noise in the audio or at least a wider audio signal given the same DSP filter setting.  I've always remarked about my TenTec radios that their CW seemed to float above the noise.  I believe it's related to the cleaner audio filtering. The TenTec Eagle just has cleaner audio out of the box. It has no audio adjustments beyond AF and NR, no menus for fine tuning.  My old TenTec Century/21 sounds the same when using its 500Hz selectivity setting. 

In my opinion Ten-Tec just got CW right.

Yes, I have tried using the KX3 RCVR EQ settings to reduce that lower frequency noise and the problem IMO is that the EQ is more for SSB audio.  I think the Q for each setting is too broad and when I try to reduce the low frequency noise IMO it just makes the audio sound mushy.  I just can't get as "clean" sounding CW tone out of the Elecraft as I can the Ten-Tec.

OK, "sound" is a subjective thing.  No two people will hear the same thing the same way and frequencies that bother me may not bother you, but it seems pretty clear from the graphs that the CW audio from the KX3 doesn't match the Eagle.

Summary

Admittedly, my test involved a very small sample size of one radio from each manufacturer.  It's just that I'd put the KX3 back on the desk after a many month absence and my ringing ears got me to investigate the cause a bit more scientifically.  

I will continue to use the KX3 for portable ops because it is a great self-contained radio and when I work portable I usually operate for much shorter periods so the audio doesn't become an issue.

Man, I hope Ten-Tec can come back from the grave. They sure made some fine radios for CW operators.


That's all for now...

So lower your power and raise your expectations

72/73
Richard AA4OO


Friday, December 30, 2016

Peace on Earth... and in the Shack

Quieting a noisy power supply

With a bit of time over the Christmas break I'm finally getting around to work on things that have bugged me for a while... like my noisy power supply.


My TenTec Century 21 doesn't have a fan and it has a built-in power supply, so no fan noise.  My Elecraft KX3 has no fan, so no fan noise and it can run all day from a small 12v battery.  My TenTec Eagle only runs fans when the finals get hot and even then the fans are in the interior of the case and are speed controlled, low-speed, high-volume dudes that I have never heard. I can feel air moving through the Eagles vents so I know the fans work, their just silent.  But the Eagle needs an external power supply.

The calming sound of CW wafting forth from the Eagle is soon destroyed by a sound not unlike an air-raid siren emitted from my Astron power supply as it kicks its fan into high gear

Problem


My power supply has a single, large fan that makes me jump every time it whirs into action.  Admittedly, my power supply was near the bottom of the range in the Astron lineup.  I assume they have speed controlled fans, or at least quieter fans further up the product line.  I purchased this one used, about 9 years ago, so who knows, maybe their new power supply's have speed controlled fans.

Anyway, on my model, the muffin fan produces a hurricane force blow switched by a thermocouple located on the transistor heat sink (right hand side).  It is a very simple design... when the thermocouple trips it closes a circuit to the fan.  When heat sink temperature falls below the threshold it cuts off.  So the fan is either ON or OFF.  Normally the fan doesn't come on when the rig is idling, and it will only come on once in a while at QRP levels.  I just never know when, but I'm always anticipating... like the jerk kid that would flick your ear when he walked by back in school (hmm, I feel as though I may have some un-dealt with issues from childhood).

The fan seems to have a knack for coming on when I'm working a station that is fading into the noise and remaining on until I've missed some key piece of the QSO.

Solution


What I wanted to do was keep the air moving like a gentle breeze rather than a pulsing Category 5, but still allow the fan to come on full speed if needed.  So the trick was to get the fan to run continuously at a slow speed whenever the power supply was on but still allow the thermocouple to give it the gas.

The label on the fan says it's 1.4w 12v... I rummaged through my junk box looking for 2w and higher resistors.   I didn't find a lot to choose from, since I just haven't been at this electronics building stuff all that long.  I had a number of very low resistance ones from 2 ohm to 20 ohm and everything else was 650 ohm or higher.

I clipped test leads to both sides of the thermocouple on the heat sink that controls the fan.  I wanted to try different resistor values to see what happened.  Predictably, the low value resistors acted pretty much like a closed circuit and the fan ran near full speed.  I could have strung a number of the low value resistors in series but that seemed messy and the values were mostly very low.  I tried my next lowest value 2-watt resistor, 650 ohm.  The fan didn't even come on with 650 ohm resistance.  I didn't have anything in between so I put two of the 650's in parallel and it turned verrrry slooowwwly.

You can find TOTAL RESISTANCE in a Parallel circuit with the following formula: 1/Rt = 1/R1 + 1/R2 + 1/R3 + ... "

Ok I was on to something.   Turned out that 5 of the 650 ohm 2w resistors in parallel did the trick... That turned out to be near 130 ohm.  I left them hooked up for an hour or so to make sure more current wasn't being pulled than I expected, and they only became slightly warm to the touch so I figured my redneck engineering was good to go.  I soldered the bundle of resistors leads in parallel and used some heat shrink to keep it neat.

I've used the power supply for a good part of a day and it stays nice and quiet now.  Not silent, but good enough to where I can't hear it at all with my headphones on.  A key down test into a dummy load at QRO power repeated times confirmed that the fan will go to full speed after a while but in normal operation, the thermocouple never triggers.

By my low standards, I deem this a success.


redneck ham engineering

Perform this mod at your own risk

This is certainly not a manufacturer approved modification and your power supply may be quite different than mine so tinker at your own risk.  Oh, and be careful when you have the cover off a power supply there are multiple, high voltage components in there.  Make sure it's unplugged and has plenty of time to bleed off power from the big capacitors before you start messing with anything in there.


That's all for now

So lower your fan speed and raise your quality of life...

72/73
Richard AA4OO

Tuesday, December 27, 2016

Go straight on Jan 1, 2017 with the Navy

ARRL Straight Key Night is January 1 starting 0000 UTC


I have a new straight key for the upcoming ARRL Straight Key Night...

Navy Flameproof Key in need of some TLC

A recent low-bid, on a famous auction site, netted me this Navy Flameproof key.  A mismatched screw and nut from my Nye Viking key is serving  as the closure spacing adjustment until I get a replacement screw and nut specific to the Flameproof from JH Bunnell Co.  I've been using it on the air and it has a distinctly different feel from my other straight keys.  There's a lot going on inside that little enclosure.

I will have this key as well as my Kent Hand Key on-the-air during this year's straight key night driving my 1977 TenTec Century 21 CW rig

Kent Hand Key in front of TenTec C21


ARRL Straight Key Night


Straight Key Night (aka SKN) occurs on the first day of each year (beginning at 0000 UTC) and runs for 24 hours.  In addition to dusting off your straight key, it has sort of become a tradition to drag out all the vintage equipment you can muster and get it on-the-air.  


What should you expect on SKN?

Last year I heard old tube rigs with a power supply issues causing chirp to rival the loveliest song bird and shaky FISTS that required full concentration to decipher.  I had a grand time hearing paddle-only operators trying to regain the knack for using their straight keys, and I could almost smell the dust burning off the tubes of those old rigs that hadn't been fired up in a year.

When you send your CQ also send SKN if you'd like.  This is not a contest and there are no awards for the most contacts, so have some good ragchews and get to know the fellow on the other side of the key.  Enjoy the slow(er) pace of working straight key stations and settle in for interesting QSOs.

Although you'll hear a lot of vintage equipment, that is certainly not required to get on the air. If you don't have a straight key you might just have a clothespin and some screws...


SKN times...


Don't forget SKN begins at 0000 UTC which means for those of you on the East coast of the US SKN starts 7pm December 31st and for those of you on the left coast it begins at 4pm, So you can get a few hours in before the bell tolls 2017 for your time zone.  


SKN runs for 24 hours, but don't put away your straight key just because it's over.  Join in the fun with the SKCC all year 'round.


That's all for now

So lower your power and raise your expectations...

72/73
Richard, AA4OO