Sunday, January 1, 2017

In the Navy... You can sail the seven seas...

Navy Flame Proof 26003A key

In my journey with amateur radio using CW and mostly low powered operations (QRP) I've slowly been accumulating and learning to use different kinds of Morse Code keys.

Navy Flame Proof (front adjustment screw is from my Nye Viking key)

But first...

Before I talk about the Navy Flame Proof let me go backwards a bit and discuss CW keys in general and why there are so many types of keys.

Broadly defined, I think most Hams lump CW keys into two categories... paddles and mechanical keys. Paddles are used with an electronic keyer that produces the actual DIT-DAH Morse Code elements where the operator is only responsible for initiating a Morse element, not controlling the duration.  Conversely, mechanical keys rely upon the operator to correctly time the length of the elements.  In the case of a "Bug" style key, the mechanical key automatically times the duration of DITS but the operator is responsible for the timing of the DAHs.

I would venture to guess that nearly all contesters use paddles because paddles (either dual or single) require less effort and are less fatiguing to use than a mechanical key.  It also seems that the majority of QRQ operators use paddles, likely for the same reason.  

But for whatever reason I'm a bit anachronistic and I usually prefer to use mechanical keys.

I started with a cheap, Philco plastic straight key hooked up to a MFJ practice oscillator.  It worked, and I made CW contacts using that key (not the practice oscillator).  I'm sure a lot of code has been sent over the years by amateurs  with such a key but no one would call a Philco a precision instrument.  I knew I wanted another straight key besides the Philco.  But unless you can visit a ham with a large CW key collection you're at a bit of disadvantage deciding what kind of key you'd like.  

CW keys are devices you have to interact with before you know if you'll enjoy them

You can read descriptions and watch videos, but using a CW key is a totally hands-on sorta thing. You might like the looks of a key but if it doesn't feel good eventually you'll set it on the shelf.  I find it fascinating how different simple mechanical switches can feel under my hand.  We are created in all shapes and sizes and with different preferences. No one is going to determine the "best key" for someone else when it comes to a device that is physically touched and manipulated tens of thousands of times over the course of its use.

OK... let me get back on topic

Alrighty then, so based on that segue it seems that reading a review and watching a video about a CW key is nearly useless. But I'm all about fruitless activity so here goes...


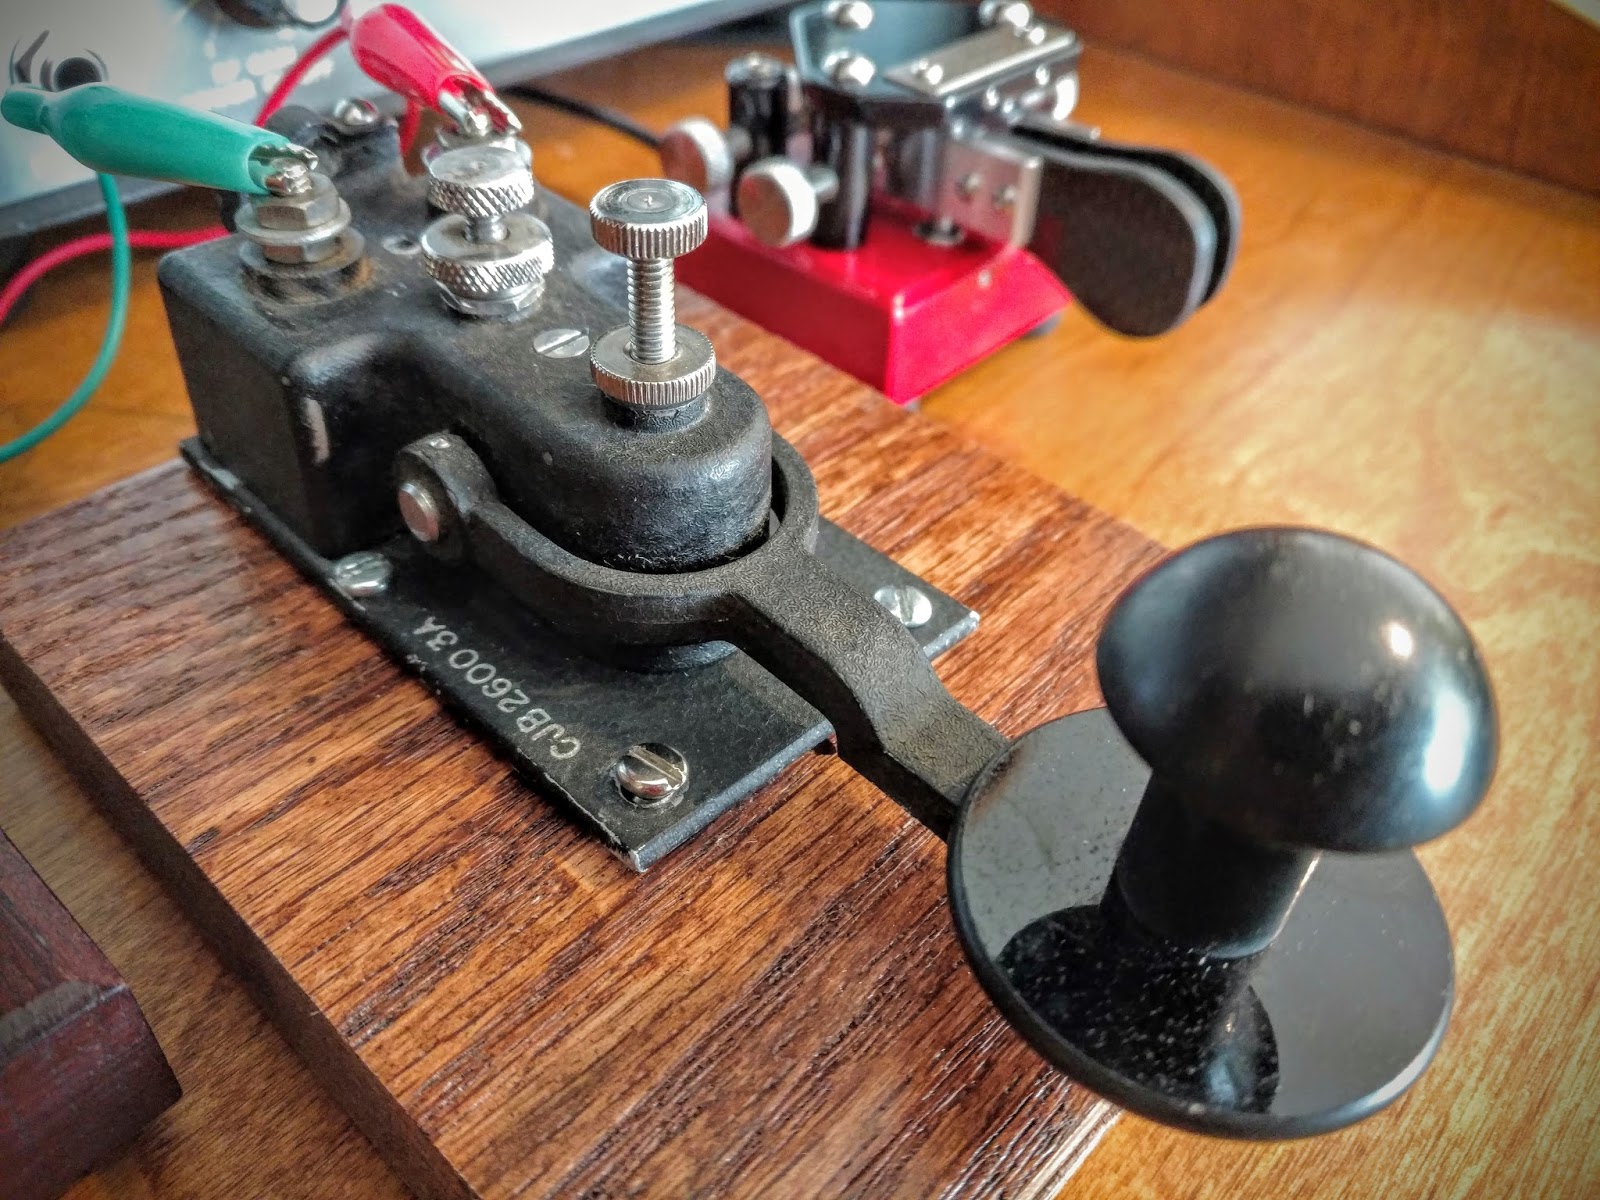
The Navy Flame Proof key was originally manufactured by several suppliers, the Navy 26003A Flame Proof key was manufactured to meet the Table of Equipment needs for ships and planes. During the last three decades of production (ending in 1988), J.H. Bunnell & Co. was the sole source of the Flame Proof key. Bunnell Flame Proofs have "CJB-26003A" stamped on them. Other letters indicate different manufacturers.  The "Flame Proof" designation is because the contacts are sealed inside the key where any potential sparking is confined.

There have been different types of Flame Proof keys manufactured through the years but the 26003A specification was the last design of the series.  My key was manufactured by J.H. Bunnell & Co. but I don't know the vintage.  It seems to have been in service with the Navy because it has a very worn ship stamp on the bottom of the key and the knob itself has seen quite a bit of handling.  There are a lot of NOS (new old stock) keys out there that were never in service are are basically "new".  I haven't had the chance to use one of those so my review is based on this used service key.

Navy Knob grip

The first thing you may note is the "grip" on the key (see the above photo).  This key has what is referred to as a "Navy knob".  That means it has a tall-rounded knob where you grip it.  This makes it distinct from J-38 style keys that are low to the desk.  You can mount this key directly to your desk to reduce the height but it is still going to present a taller grip than a typical American style key.  My preference is for tall keys because I operate "European Style" where my arm is not resting on the table.  I find it less fatiguing. This article at Morse Express has a good description of the differences in European and American style keys and operation.


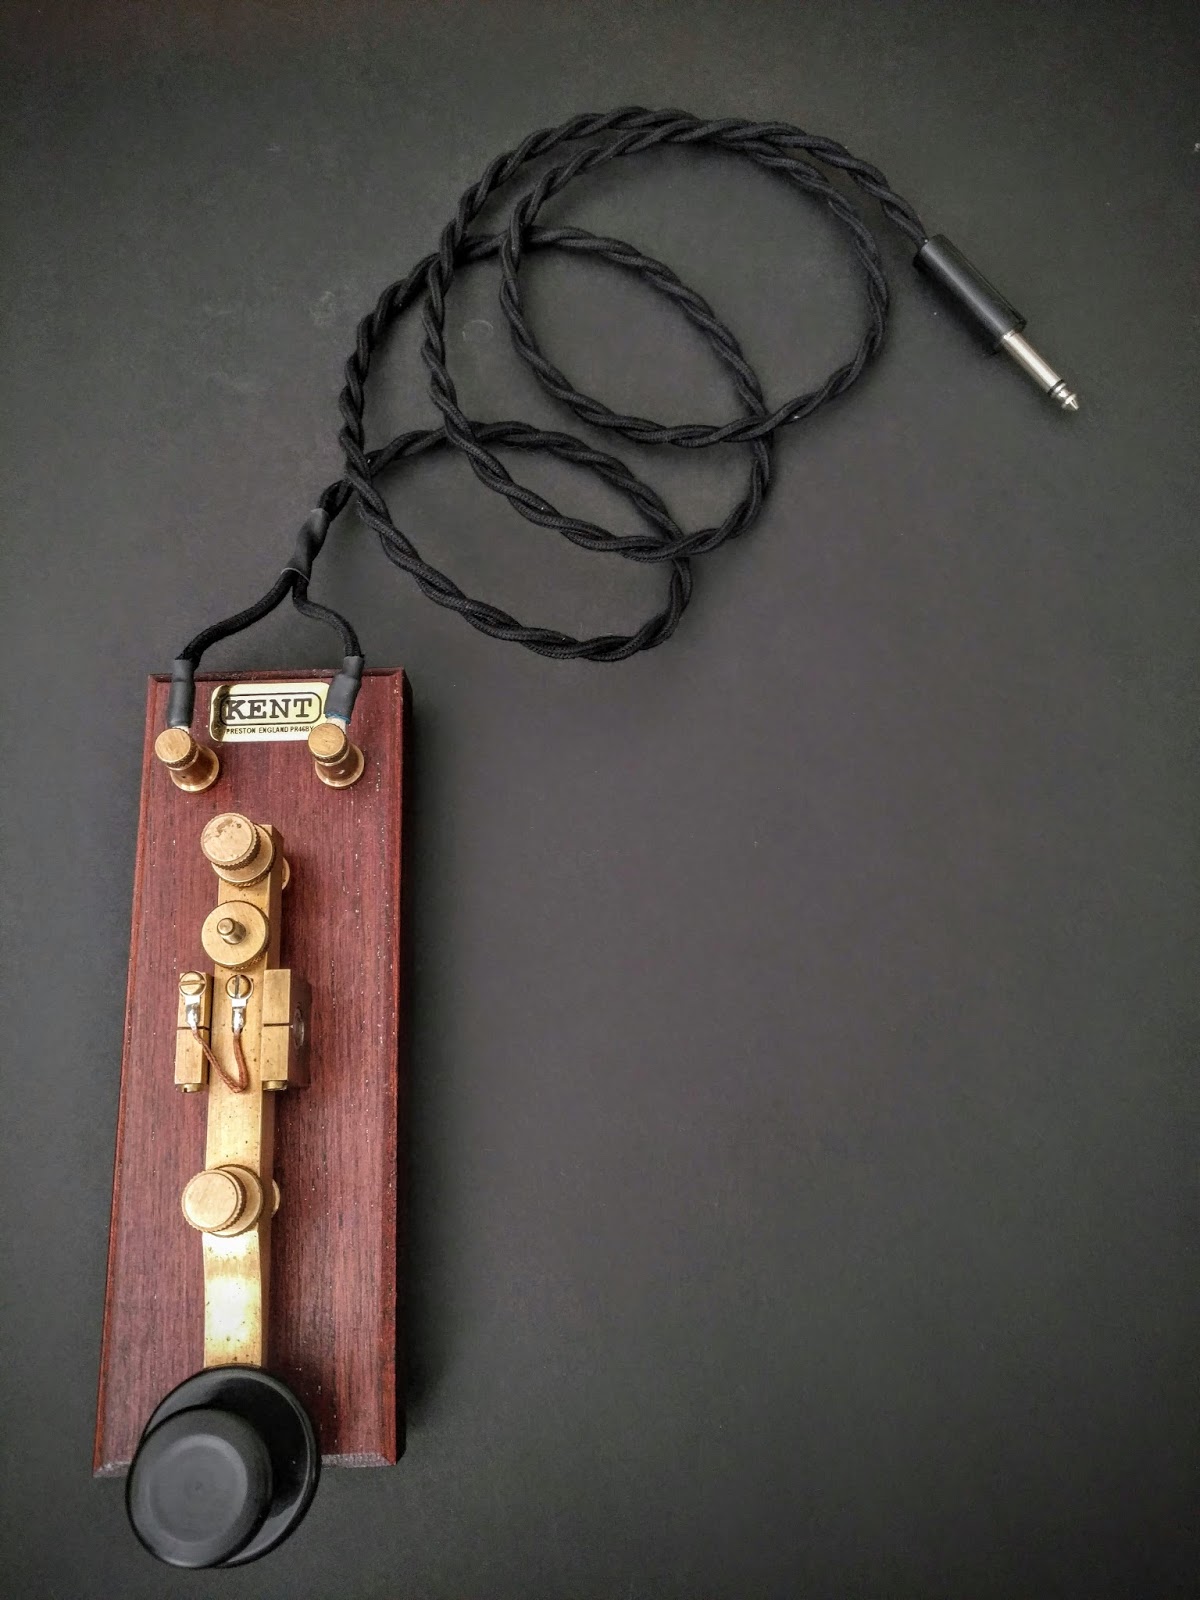
Kent Hand (left)  Navy Flame Proof 26003A (right)

You can also see my Kent Hand Key in photo above next to the 26003A.  It has a different shape to the knob and the disc underneath is different as well.  The difference in the two knob shapes results in a markedly different feel to gripping the key.  My first interaction with the 26003A was uncomfortable.  I was gripping it as I would the Kent and it hurt my thumb, but within an hour of use I'd adjusted my grip and the key became quite comfortable.

You'll note that my key has a non-stock gap adjustment screw in the front and no plastic cover for the terminals (partly why I got it so cheaply).  When it arrived it had a standard slotted 8-32 screw in that position but I wanted to be able to easily adjust it so I borrowed a knurled 8-32 screw and nut from my Nye Viking key (which I've never grown fond of) and put it in service.   J.H. Bunnell & Co. still has parts and I plan to order the matching screw and nut if I keep this key on the desk.

The Kent is a rather traditional straight key (albeit Euro style) with the contact in front of the bearings, whereas the Navy Flame Proof has the contacts behind the bearings.  Both the difference in leverage and travel to the contact gives it a different feel than the Kent.


Interior

So, the difference in grip, knob height and gap from my Kent combines to make the 26003A feel like a very different key.  Without trying I naturally send about 2 wpm faster on this key than my Kent.  When I try to go fast with my Kent things go awry but I can comfortably operate this key at 19 wpm.  A 3rd class radioman in the Navy passed a 20 wpm test so I'm confident that this key can be used faster than I'm operating it.

Ready - Set - Action !

In use, the Navy Flame Proof is quiet.  The contacts are inside the metal body and the only real noise is the arm striking the gap setting front screw.  Some folks seem to find that noisy and offer various recommendations for quieting that gap screw.  I've mounted my key to an inexpensive award plaque (under $3) and it's resting on thin shelf lining.  Compared to my Kent Hand Key which sounds like a woodpecker in action this key is downright silent.

The following video was made during last night's ARRL straight key night event and you can see how I use the key during a QSO.


Summary

So should you get one?  Absolutely! There's a strong market on e$ay for these keys so if you don't like it you can easily find it a new home.  These keys tend to auction from as little as $36 up to $150.  The average auction price at present seems to be in the $90 range.  I kept bidding low on different auctions and eventually picked this one up one for $41 including shipping, so if you're patient you can give it a try for about the cost of a J-38.

If you've not gripped a "Navy knob" previously give your hand some time to find a comfortable hold, you may also want to experiment with different base heights.  I've had mine on a couple different scrap wood bases to try different heights and presently I like this 1/2" base but I might find a piece of steel to attach it to get it down low.

So get a bit of salt air in your shack with a Navy Flame Proof key.


Anachronisms

That's all for now

So lower your power and raise your expectations

72/73
Richard AA4OO

Friday, December 30, 2016

Peace on Earth... and in the Shack

Quieting a noisy power supply

With a bit of time over the Christmas break I'm finally getting around to work on things that have bugged me for a while... like my noisy power supply.


My TenTec Century 21 doesn't have a fan and it has a built-in power supply, so no fan noise.  My Elecraft KX3 has no fan, so no fan noise and it can run all day from a small 12v battery.  My TenTec Eagle only runs fans when the finals get hot and even then the fans are in the interior of the case and are speed controlled, low-speed, high-volume dudes that I have never heard. I can feel air moving through the Eagles vents so I know the fans work, their just silent.  But the Eagle needs an external power supply.

The calming sound of CW wafting forth from the Eagle is soon destroyed by a sound not unlike an air-raid siren emitted from my Astron power supply as it kicks its fan into high gear

Problem


My power supply has a single, large fan that makes me jump every time it whirs into action.  Admittedly, my power supply was near the bottom of the range in the Astron lineup.  I assume they have speed controlled fans, or at least quieter fans further up the product line.  I purchased this one used, about 9 years ago, so who knows, maybe their new power supply's have speed controlled fans.

Anyway, on my model, the muffin fan produces a hurricane force blow switched by a thermocouple located on the transistor heat sink (right hand side).  It is a very simple design... when the thermocouple trips it closes a circuit to the fan.  When heat sink temperature falls below the threshold it cuts off.  So the fan is either ON or OFF.  Normally the fan doesn't come on when the rig is idling, and it will only come on once in a while at QRP levels.  I just never know when, but I'm always anticipating... like the jerk kid that would flick your ear when he walked by back in school (hmm, I feel as though I may have some un-dealt with issues from childhood).

The fan seems to have a knack for coming on when I'm working a station that is fading into the noise and remaining on until I've missed some key piece of the QSO.

Solution


What I wanted to do was keep the air moving like a gentle breeze rather than a pulsing Category 5, but still allow the fan to come on full speed if needed.  So the trick was to get the fan to run continuously at a slow speed whenever the power supply was on but still allow the thermocouple to give it the gas.

The label on the fan says it's 1.4w 12v... I rummaged through my junk box looking for 2w and higher resistors.   I didn't find a lot to choose from, since I just haven't been at this electronics building stuff all that long.  I had a number of very low resistance ones from 2 ohm to 20 ohm and everything else was 650 ohm or higher.

I clipped test leads to both sides of the thermocouple on the heat sink that controls the fan.  I wanted to try different resistor values to see what happened.  Predictably, the low value resistors acted pretty much like a closed circuit and the fan ran near full speed.  I could have strung a number of the low value resistors in series but that seemed messy and the values were mostly very low.  I tried my next lowest value 2-watt resistor, 650 ohm.  The fan didn't even come on with 650 ohm resistance.  I didn't have anything in between so I put two of the 650's in parallel and it turned verrrry slooowwwly.

You can find TOTAL RESISTANCE in a Parallel circuit with the following formula: 1/Rt = 1/R1 + 1/R2 + 1/R3 + ... "

Ok I was on to something.   Turned out that 5 of the 650 ohm 2w resistors in parallel did the trick... That turned out to be near 130 ohm.  I left them hooked up for an hour or so to make sure more current wasn't being pulled than I expected, and they only became slightly warm to the touch so I figured my redneck engineering was good to go.  I soldered the bundle of resistors leads in parallel and used some heat shrink to keep it neat.

I've used the power supply for a good part of a day and it stays nice and quiet now.  Not silent, but good enough to where I can't hear it at all with my headphones on.  A key down test into a dummy load at QRO power repeated times confirmed that the fan will go to full speed after a while but in normal operation, the thermocouple never triggers.

By my low standards, I deem this a success.


redneck ham engineering

Perform this mod at your own risk

This is certainly not a manufacturer approved modification and your power supply may be quite different than mine so tinker at your own risk.  Oh, and be careful when you have the cover off a power supply there are multiple, high voltage components in there.  Make sure it's unplugged and has plenty of time to bleed off power from the big capacitors before you start messing with anything in there.


That's all for now

So lower your fan speed and raise your quality of life...

72/73
Richard AA4OO

Thursday, December 29, 2016

Making your old Morse straight key look the part

Vintage Wiring

In honor of the upcoming SKN I wanted to spruce up my Kent Hand key by replacing the ratty cable that I'd hastily made back in 2015 by hacking a cheap, old electric guitar cable with something more suitable to the Kent's grande and imposing nature.

I also wanted a vintage look.  I've always liked the look of old fabric covered wires, although not their dubious safety record.  But alas, modern times and a desire in some quarters for a "retro-look" for antique lighting gives us cotton covered, dual conductor, twisted wire.  The actual stranded wire core is covered by teflon covering for proper insulation.

Cotton covered wire to suit the key

Making your cable

Fabric covered wire is available from a number of sellers and provides a vintage look for your old CW straight key.  There appear to be mainly two different types of fabric covered wires, Rayon and Cotton.  The Rayon covered wires look "shiny" due to the synthetic material, they also are likely sturdier.  Cotton covered wires are not shiny and get a bit fuzzy with handling.  I went with Cotton covered wire but I'm sure Rayon would be fine too.

You can't just use wire cutters or a wire stripper on the cloth covered wires.  That just makes a fabric "blob" (ask me how I know).  I used a very sharp knife to cut the fabric around the insulation where I was going to strip, then used a wire stripper on the teflon covered portion of the wire.  Also note that cloth fabric will fray when it's been cut so use some heat shrink tubing to neaten it up, or if you really want to get fancy; lash the fraying bit with some thread for a half inch or so and tie it off.  I'm not patient enough to do that so I used heat shrink tubing.  I used another piece of larger heat shrink around both conductors further up the wire to keep them from unwinding.

If you use Rayon covered wire be careful with the heat gun when you shrink the tubing, as the Rayon probably has a low melting temperature.

Lastly, since the new cable is un-shielded, keep lengths reasonably short so as not to become RF conductors in the shack.


That's all for now...

So lower your power and raise your expectations.

72/73
Richard AA4OO
http://hamradioqrp.com

Tuesday, December 27, 2016

Go straight on Jan 1, 2017 with the Navy

ARRL Straight Key Night is January 1 starting 0000 UTC


I have a new straight key for the upcoming ARRL Straight Key Night...

Navy Flameproof Key in need of some TLC

A recent low-bid, on a famous auction site, netted me this Navy Flameproof key.  A mismatched screw and nut from my Nye Viking key is serving  as the closure spacing adjustment until I get a replacement screw and nut specific to the Flameproof from JH Bunnell Co.  I've been using it on the air and it has a distinctly different feel from my other straight keys.  There's a lot going on inside that little enclosure.

I will have this key as well as my Kent Hand Key on-the-air during this year's straight key night driving my 1977 TenTec Century 21 CW rig

Kent Hand Key in front of TenTec C21


ARRL Straight Key Night


Straight Key Night (aka SKN) occurs on the first day of each year (beginning at 0000 UTC) and runs for 24 hours.  In addition to dusting off your straight key, it has sort of become a tradition to drag out all the vintage equipment you can muster and get it on-the-air.  


What should you expect on SKN?

Last year I heard old tube rigs with a power supply issues causing chirp to rival the loveliest song bird and shaky FISTS that required full concentration to decipher.  I had a grand time hearing paddle-only operators trying to regain the knack for using their straight keys, and I could almost smell the dust burning off the tubes of those old rigs that hadn't been fired up in a year.

When you send your CQ also send SKN if you'd like.  This is not a contest and there are no awards for the most contacts, so have some good ragchews and get to know the fellow on the other side of the key.  Enjoy the slow(er) pace of working straight key stations and settle in for interesting QSOs.

Although you'll hear a lot of vintage equipment, that is certainly not required to get on the air. If you don't have a straight key you might just have a clothespin and some screws...


SKN times...


Don't forget SKN begins at 0000 UTC which means for those of you on the East coast of the US SKN starts 7pm December 31st and for those of you on the left coast it begins at 4pm, So you can get a few hours in before the bell tolls 2017 for your time zone.  


SKN runs for 24 hours, but don't put away your straight key just because it's over.  Join in the fun with the SKCC all year 'round.


That's all for now

So lower your power and raise your expectations...

72/73
Richard, AA4OO  

Saturday, December 24, 2016

Merry Christmas 2016

A Ham's Night Before Christmas

The snow inside is frightful


'Twas the night before Christmas,  
And all through two-meters,  
Not a signal was keying up  
Any repeaters.

The antennas reached up 
From the tower, quite high, 
To catch the weak signals 
That bounced from the sky.

The children, Tech-Pluses, 
Took their HT's to bed, 
And dreamed of the day 
They'd be Extras, instead.

Mom put on her headphones, 
I plugged in the key, 
And we tuned 40 meters 
For that rare ZK3.

When the meter was pegged 
by a signal with power. 
It smoked a small diode, 
and, I swear, shook the tower.

Mom yanked off her phones, 
And with all she could muster 
Logged a spot of the signal 
And the DX Packet Cluster,

While I ran to the window 
And peered up at the sky, 
To see what could generate 
RF that high.

It was way in the distance, 
But the moon made it gleam - 
A flying sleigh, with an 
Eight element beam,

  And a little old driver 
Who looked slightly mean. 
So I thought for a moment, 
That it might be Wayne Green.

  But no, it was Santa, 
The Santa of Hams. 
On a mission, this Christmas, 
To clean up the bands.

He circled the tower, 
Then stopped in his track, 
And he slid down the coax 
Right into the shack.

While Mom and I hid 
Behind stacks of CQ, 
This Santa of hamming 
Knew just what to do.

He cleared off the shack desk 
Of paper and parts, 
And filled out all my late QSLs 
For a start.

He ran copper braid, 
Took a steel rod and pounded 
It into the earth, till 
The station was grounded.

He tightened loose fittings, 
Resoldered connections, 
Cranked down modulation, 
Installed lightning protection.

He neutralized tubes 
In my linear amp... 
(Never worked right before- 
Now it works like a champ).

A new, low-pass filter 
Cleaned up the TV. 
He corrected the settings 
In my TNC.

He repaired the computer 
That would not compute, 
And he backed up the hard drive 
And got it to boot.

Then, he reached really deep 
In the bag that he brought, 
And he pulled out a big box. 
A new rig? I thought!

A new Kenwood? An Icom? 
A Yaesu, for me?! 
(If he thought I'd been bad  
It might be QRP!) haha

Yes! The Ultimate Station! 
How could I deserve this? 
Could it be all those hours 
That I worked Public Service?

He hooked it all up 
And in record time, quickly 
Worked 100 countries,

All down on 160. 
I should have been happy, 
It was my call he sent. 
But the cards and the postage 
Will cost two month's rent!

He made final adjustments, 
And left a card by the key: 
"To Gary, from Santa Claus. 
Seventy-Three."

Then he grabbed his HT, 
Looked me straight in the eye, 
Punched a code on the pad, 
And was gone - no good-bye.

I ran back to the station, 
And the pile-up was big, 
But a card from St. Nick 
Would be worth my new rig.

Oh, too late, for his final  
Came over the air. 
It was copied all over. 
It was heard everywhere.

The Ham's Santa exclaimed 
What a ham might expect, 
"Merry Christmas to all, 
And to all, good DX."

Permission granted for any print 
or electronic reproduction.


A Morse Code Christmas message 


Richard, AA4OO 


Wednesday, December 21, 2016

Ewww Cooties

Take a swipe at it

The "Cootie" key or "Sideswiper" is basically a double-sided straight key and has a reputation for being very hard to learn, possibly harder even than the Vibroplex Bug.  My recent bug practice has been going well so I figured I would add a new level of difficulty by adding a completely different style of key into my brain mix... 

A Cootie key


Using a Palm Single in Sideswiper mode.  It is magnetically attached to a solid steel base.


My Palm Paddle Single has an internal adjustment that turns it into a sideswiper... 

Instructions for turning the Palm Single into a Sideswiper

That means that touching either side of the paddle closes the tip contact of the key jack, rather than operating the ring and the tip independently.   

Cooties?

Google "cootie" and you come up with 'body louse'... well at least you come up with that definition.  (hopefully you don't actually get body lice).  We are talking about a different kind of cootie here... 

Morse Express has an article with an excellent description and history of the cootie key here.  

I had some interest in operating a sideswiper because a good friend of mine Kurt (N4KJK) uses one regularly and I admire his skill with it.  I spent a short time in 2015 practicing with my Palm Single as a sideswiper and was horrible.  I quickly gave up.  Now with another year of CW in my brain and different types of keys (straight, iambic paddle and bug) swimming around my consciousness I took another shot.

I figured that I would spend an hour practicing side-swiperry and if I was making some progress I would continue the process, and maybe build a real side-swiper key using a hacksaw blade.  Before building a key I wanted to practice with what I already had.  I spent an hour this morning practicing sideswiper style with the Palm Single in Cootie mode and I went from really terrible to simply terrible, which in my book is great progress.

Level of Difficulty ?

You might have heard that the sideswiper is hard to learn... In general I'd say it is very different to what you may have already learned.  If the sideswiper were the first key you tried to use you might have no more difficulty learning it that anything else.  The problem is that it's completely different than EVERY OTHER morse key in the way it's operated.

The sideswiper is operated by swinging your thumb and forefinger back and forth rhythmically, where each opposing finger operates the key once for an individual element, rather than repeating any elements on one finger.   For a straight key you are always operating in the same direction... down.  Repeating elements, say the 3 DITS in an 'S' are repeated downward on the key.  In the case of a paddle or bug, your left thumb is pressing to repeat the 3 elements of an 'S'.  In the case of the letter 'O', your right index finger (or fingers) are accomplishing the repeating elements (DAHs in this case).  In the case of the sideswiper/cootie each finger participates in repeating elements and the order in which finger begins the process is completely up to chance.   So for an 'S' or an 'O' you might start with the thumb or the index finger depending on which finger last operated the key... the finger that's swinging toward the key at the time performs one element of the character then leaves the next element to the other finger...
"Arrrgh... it burns, it burns"
This is so completely different than operating other keys you simply must practice the mechanics that you've painstakingly built into your hand away to the beautiful simplicity of the cootie.  Or at least that's what I'm telling myself.

So operating a bug takes some getting used to because you are timing the inter-character element transitions from index finger to thumb rather than an electronic keyer, but at least it's similar enough to a paddle that you are expecting to do the DAHs with your index and middle finger and your DITs are always accomplished by your thumb.  

The old rules are gone.  All your finely tuned muscle memory is thrown to the ether.  You are freed of preconceptions of sending code and you become "Ambidextrous" with regard to DITs and DAHs.  All your political affiliations are out the window as you now are able to approach a character from the  RIGHT or LEFT.

Ok I'm obviously just being silly now but maybe you get my point.  Give the sideswiper a try.  It will absolutely clean plaque out of your brain.  I'm fairly certain that just as learning and using Morse Code staves off brain disease... using all 4 types of Morse code keys in a round-robin fashion (Straight, Paddle, Bug and Cootie) will make your brain look like a young Arnold Schwarzenegger back in his Mr. Universe days.

Video


Here's a demonstration after an hour of practice... be kind in the comments section :)


That's all for now

So lower your power and take a swipe at your key... from both directions

72/73
Richard, AA4OO 

Tuesday, December 20, 2016

Now where did I put that?

HamRadioQRP now has a TOC

This blog has grown a bit over the past year since I do tend to blah, blah, blah about things.  

The standard blogger toolbox allowed me to add a search box (located in the upper right of desktop viewed pages) and an "archive" tab that allowed you to choose a month of posts in the past, but it has become difficult to find a particular post and there was no built-in way to offer a Table of Contents.

So this week through some Javascript wizardry I added a Table of Contents page.  This is accessible from the menu bar at the top on desktop versions of the site.  

If you visit using a mobile device the site formats to a more mobile friendly display and you can't see the menu bar in its entirety.  If you're viewing on a mobile device you have to touch the bar near the top of the display labeled "Home" and then choose "Table of Contents",

Now when I add new posts they will be automatically added to the TOC in an alphabetized list.  Newer articles will be marked with "New".  Unfortunately I'm a bit too clever with the titles of many of my posts; so often times you can't really tell what a post is about without clicking on the title but at least the opportunity to go exploring is available now.

Additional categorization coming

I'll be adding some additional subheadings to the TOC as I figure out how to better divide the content.  

This blog has grown a bit beyond my initial plans.  I originally intended it to simply be a sort of personal journal of what I was discovering as I learned about QRP and Morse Code but based on the response of viewers, my musings seem to have become useful or at least entertaining to other ham radio operators.  So hopefully the TOC will make it easier to find older content than scrolling page by page into the past.

Just a reminder that this blog is my own journey of discovery and I am far, far from an authority on most of what I write about.  I often find out that I'm quite mistaken about something I've written so take the information you find here with a double bag of salt :)

Questions or ideas for new posts?

As you read the blog, if you have questions or corrections and even suggestions for new posts please add comments to any of the posts.  I try and check on comments at least once a week and I'll follow-up as I'm able.


That's all for now

So lower your power and raise your expectations...

72/73
Richard, AA4OO