Situational awareness
After reading all the hoopla surrounding the ICOM 7300 with its nice touch screen and waterfall/spectrum display, it got me to thinking that I was missing out on something.
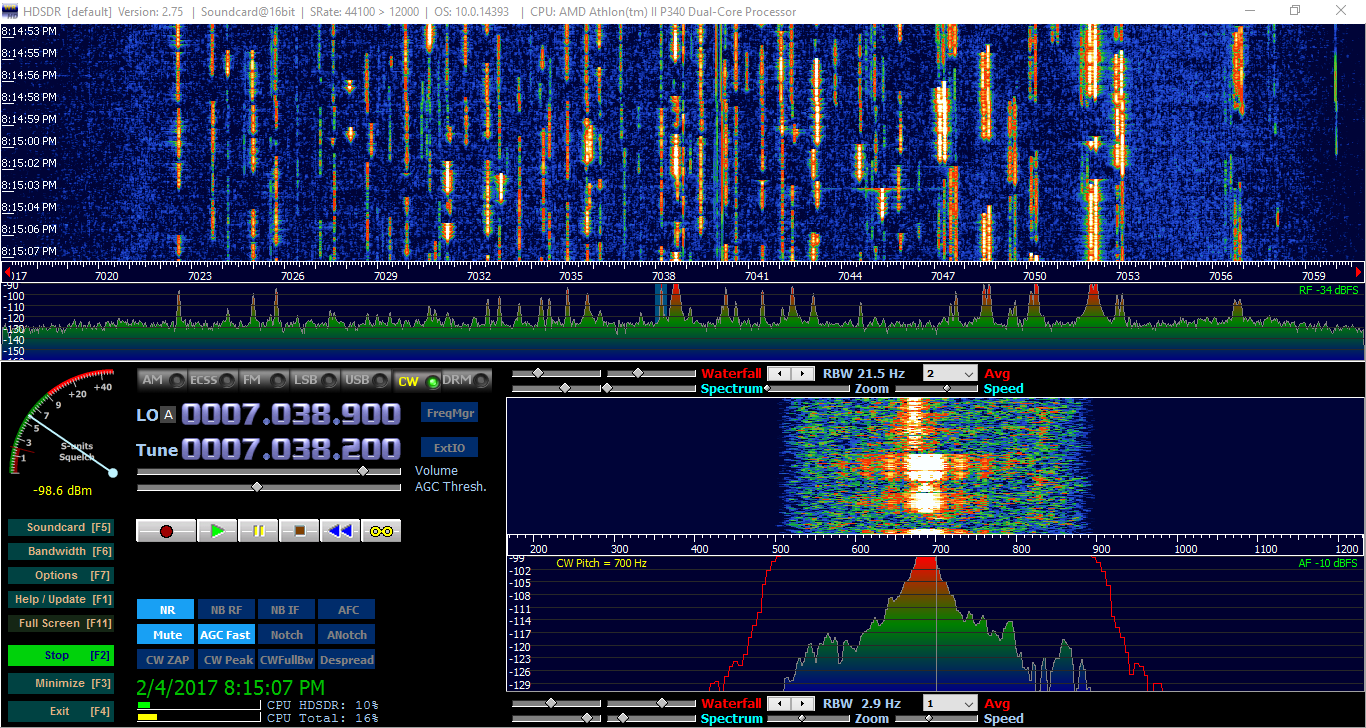 |
| HDSDR display on 40m tonight |
When I first got my Electraft KX3 I hooked it up to HDSDR running on my PC and played around with the panadapter display. I admit it is very cool to visualize signals on the band. That 44kHz view shown in HDSDR covers a large portion of the commonly used CW band segments. I'd click on a signal and bam there it was tuned right in. I'd listen for a while and click another, and another. It was like shooting fish in a barrel (although I admit I've never tried shooting fish in a barrel). After a while the novelty wore off and I went back to just tuning around the band.
There seemed to be more magic in stumbling upon someone calling CQ than looking at the bandscope and choosing the strongest signal.
There seemed to be more magic in stumbling upon someone calling CQ than looking at the bandscope and choosing the strongest signal.
Taking it all in
But I'm starting, just starting, to be more interested in working DX and potentially doing some contesting this year and for that I can definitely see an advantage to using a panadapter with the radio to see what's around me at a glance.
However, as you may have read, I prefer using my TenTec Eagle over my KX3 at the desk. But my Eagle is an older model made before the panadapter output came standard and even before they offered a provision for hooking one up.
My friend AA4XX uses a separate SDR with a input splitter and a DX Engineering RTR-1A receive interface to switch the SDR out of the chain when transmiting. The advantage of his solution is that it works with any transceiver but the relay in that unit is quite noisy and I appreciate the quiet full QSK offered by my radios.
 |
| Using a SDR as a receiver protected during transmit by a DX-Engineering RTR-1A |
One option for an older Eagle like mine is to take the input for a SDR straight from the input of the Low Pass Filter. That line is switched out on transmit by the Eagle to protect its own receiver so no separate switching circuit is required. There's a tiny coax that would need to be spliced into which Paul assures me is doable mod with the right equipment. I would still need to buy an external SDR and it should be a good quality one or there's little point.
So I've been operating my KX3 at the desk this week using its built in RX/IQ to feed HDSDR to see if I like the idea enough to spend the money on doing this for the Eagle. It's been over a year since I had this setup and I've switched computers so I had to go throuth the setup again and I thought it was worth documenting in case there are others that want to do this with their KX3's.
HDSDR is a really nicely done program, doubly so because it's free. It can be fed from an SDR or from your sound card. It interfaces to the control the radio using Omni-rig software.
So the setup is in two parts, configuring Omni-rig and secondly configuring four your sound card.
Configuration for the KX3 is mostly straightforward. Click the options button HDSDR. The only part that trips me up each time is configuring the CW offset in [RF Front end configuration]. Make note of your side tone Hz setting on your KX3 by pressing and holding the CMP/PITCH button. Also be sure that you haven't inadvertently set CW reverse on some bands because that will really have you pulling your hair out as you try and figure out why the signals line up on some bands but not others.
So to set your CW offset correctly put your sidetone Hz as a negative number in CW_L and subtract your sidetone from 1000 Hz and put that value in CW_U as shown below. Everything else should be set as shown.
Choose the Omni-rig configuration as shown below to match your station settings.
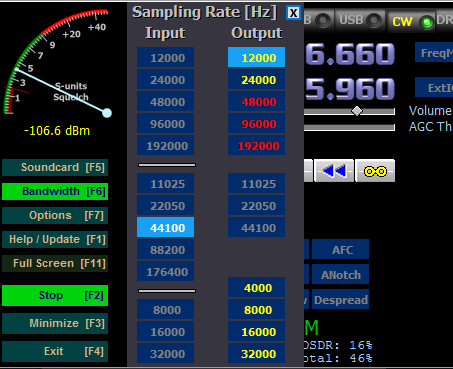
Lastly make sure RX/IQ output is turned on in your KX3 by setting MENU: RX I/Q to ON. Run the KX3 RX/IQ cable to your mic input on your PC. Then choose your sound card bandwidth setting in HDSDR. I'm not sure what the available bandwidth from the KX3 RX/IQ actually is but on all the PCs I've tried it with a bandwidth of 44100 seems to work best.
That's basically all there is to it. If you see a bunch of "lines" in the waterfall display that do not correspond to signals and if there is a thick signal line right at your input frequency then your station grounding is insufficient. See my article on grounding. When I first set this up I had insufficient station grounding and saw a lot of artifacts in HDSDR that were due to bad grounding between my PC and the radio. So it will let you know if you have grounding problems.
So if you're lusting after that pretty display in the IC-7300 and don't want to shell out for another shiny toy, you can at least get a pretty display out of your KX3 without buying a PX3. Just use HDSDR and the built-in RX/IQ.
That's all for now...
So lower your power and see the signals in technicolor
72/73
Richard AA4OO
http://hamradioqrp.com
So I've been operating my KX3 at the desk this week using its built in RX/IQ to feed HDSDR to see if I like the idea enough to spend the money on doing this for the Eagle. It's been over a year since I had this setup and I've switched computers so I had to go throuth the setup again and I thought it was worth documenting in case there are others that want to do this with their KX3's.
HDSDR is a really nicely done program, doubly so because it's free. It can be fed from an SDR or from your sound card. It interfaces to the control the radio using Omni-rig software.
So the setup is in two parts, configuring Omni-rig and secondly configuring four your sound card.
Omni-rig
Omni-rig is freeware CAT control software. In the case of the KX3 it interfaces using the USB control cable that comes with the KX3. Simply choose the serial port that your computer assigned to the KX3 and match the baud rate settings in the KX3.
 |
| omni-rig settings for my KX3 |
HDSDR configuration
Download HDSR.
So to set your CW offset correctly put your sidetone Hz as a negative number in CW_L and subtract your sidetone from 1000 Hz and put that value in CW_U as shown below. Everything else should be set as shown.
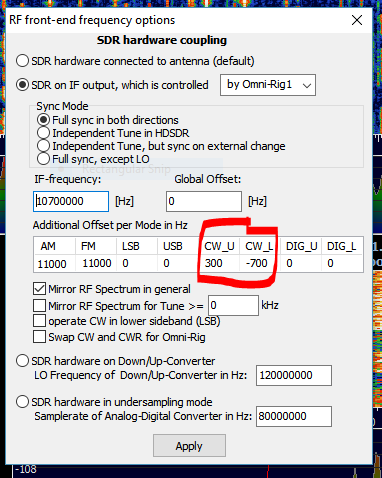 |
| RF-front end configuration screen |
Choose the Omni-rig configuration as shown below to match your station settings.
 |
| CAT to radio settings |
Lastly make sure RX/IQ output is turned on in your KX3 by setting MENU: RX I/Q to ON. Run the KX3 RX/IQ cable to your mic input on your PC. Then choose your sound card bandwidth setting in HDSDR. I'm not sure what the available bandwidth from the KX3 RX/IQ actually is but on all the PCs I've tried it with a bandwidth of 44100 seems to work best.
 |
| soundcard bandwidth |
That's basically all there is to it. If you see a bunch of "lines" in the waterfall display that do not correspond to signals and if there is a thick signal line right at your input frequency then your station grounding is insufficient. See my article on grounding. When I first set this up I had insufficient station grounding and saw a lot of artifacts in HDSDR that were due to bad grounding between my PC and the radio. So it will let you know if you have grounding problems.
So if you're lusting after that pretty display in the IC-7300 and don't want to shell out for another shiny toy, you can at least get a pretty display out of your KX3 without buying a PX3. Just use HDSDR and the built-in RX/IQ.
That's all for now...
So lower your power and see the signals in technicolor
72/73
Richard AA4OO
http://hamradioqrp.com


