Constructing an RF jumper cable for BNC to PL-259
HF QRP radios and accessories typically use BNC antenna connectors. But most HF amatuer station equipment like antenna switches and tuners are designed for PL-259 connectors. Adapters are available to convert between the two but every additional connection adds some resistance with a bit of loss. Plus, all those adapters add weight and create torque on fragile QRP BNC connectors.
 |
| BNC to PL-259 jumper cable |
As the number of connections between radios, switches, meters and tuners increases the number of adapters you need to adapt different connector types becomes a bit crazy. I have a box of the things and I still run into configurations where I don't have the right combination.
50 ohm jumper cables between different connector types can be purchased, but making them yourself will both save you money and will increase your Ham mojo. Usually "crimp-on" connectors, which are a bit of a misnomer because soldering is required, can be purchased for less than $1 per connector. While the braid is "crimped-on" the center conductor should be soldered to the center pin.
RG-58A/U (flexible, stranded center conductor) is inexpensive and suitable for jumpers. It has more loss and less power handling than larger coax cables but given the short length of jumpers the loss is not significant at HF frequencies and is suitable up to 100w. Note that RG-58 coax is solid conductor. Stranded is more flexible and durable (usually noted as RG-58A/U).
Equipment needed
Besides a soldering iron you'll need the following, and some heat shrink tubing if you wish to make it look neat.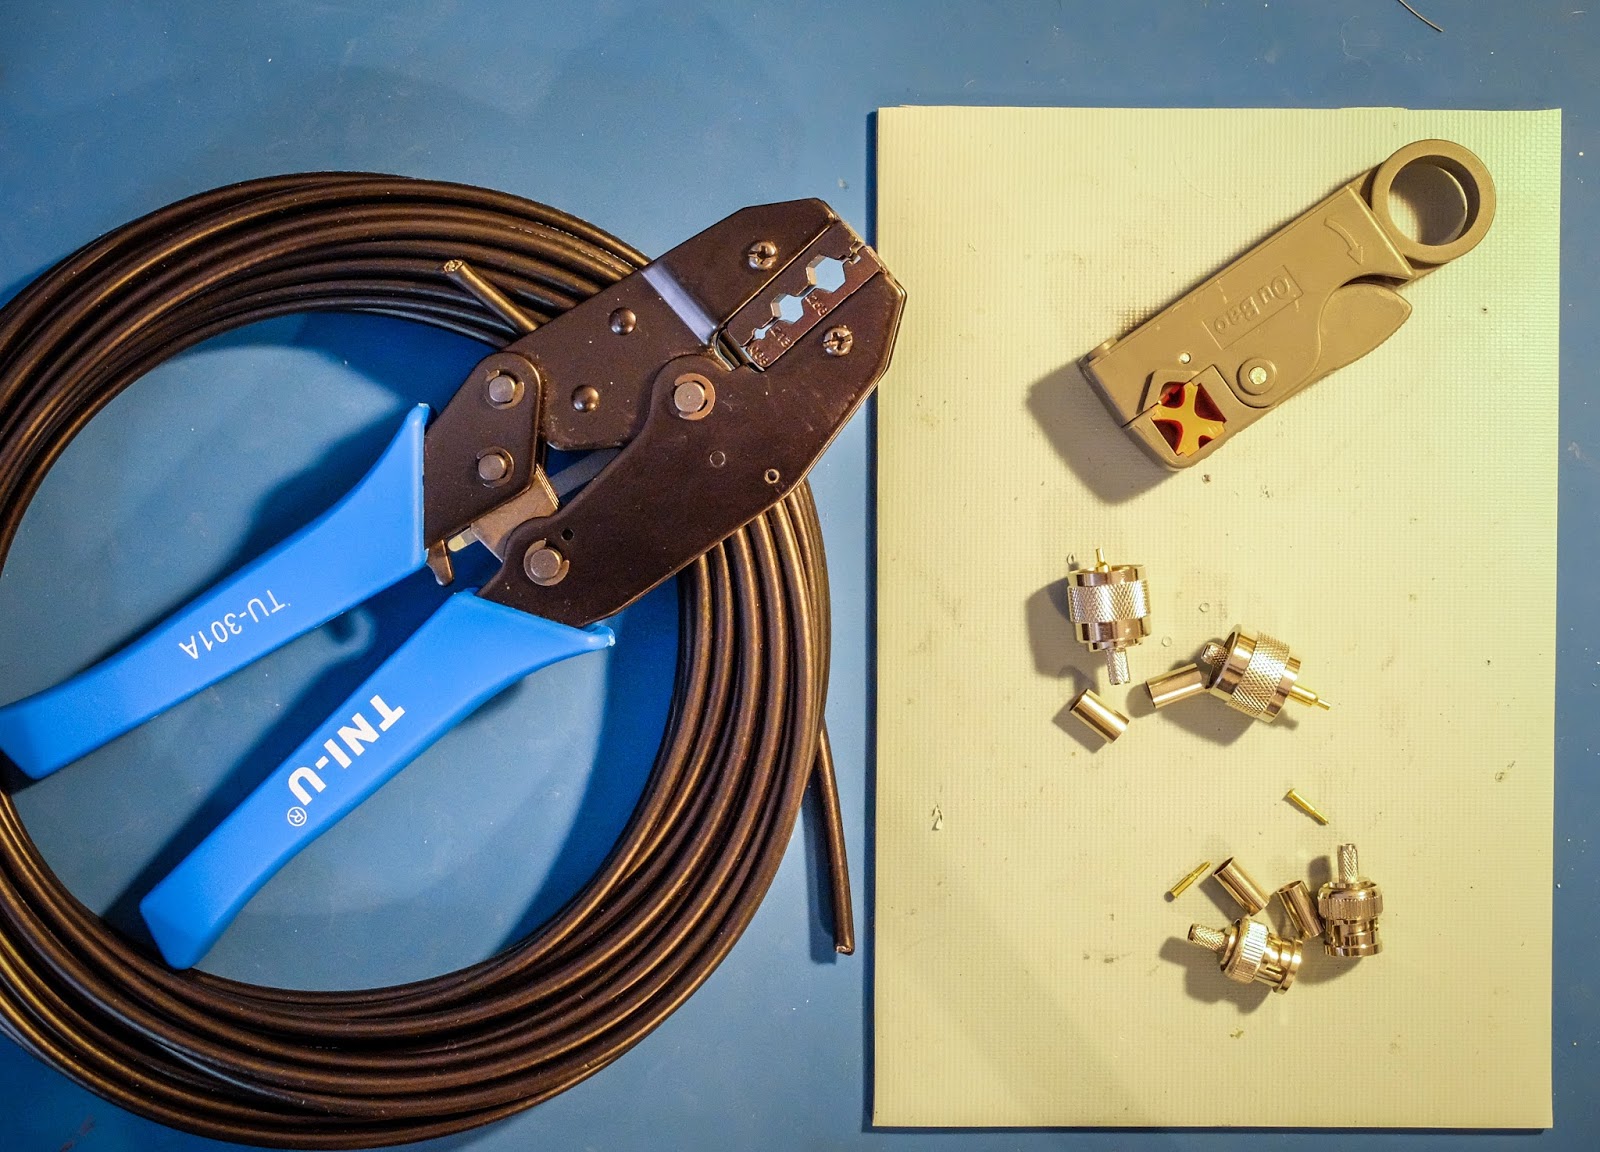 |
| RG-58A/U, Crimper, Coax stripper, PL-259 and BNC connectors |
Trying to crimp a connector with pliers will only bring you grief (trust me I know). Additionally, trying to strip your coax with a knife rather than a dedicated tool will lead you to use vocabulary that would make your momma wash your mouth out with soap. A decent crimper and coax cutter are not expensive and will save you a ton of time as well as make your work go much quicker.
Bring out the stripper -- No bachelor party required
 |
| Stripped coax |
Once you've adjusted the blades no further adjustment should be required as long as you're using the same coax. Just be patient as you get the settings correct.
The length of insulator remaining over the center conductor will be longer for the PL-259 versus the BNC. Watch the video for how to measure.
Connectors
 |
| PL-259 and BNC crimp-on connectors |
Note that both connectors come with a sleeve that will be crimped over the knurled section of the connector, clamping the shield braid against the knurled section of the connector.
Note in the photo that the BNC center conductors are not built into the connector. Their center pins have to be carefully placed over the center conductor of the coax and soldered before inserting through the BNC connector body. The length of the center conductor above the folded braid is important so be prepared to sacrifice one or two connectors to get the hang of it.
When you cut the coax you need to leave enough center conductor to emerge out through the center tip of the PL-259 so that solder will wick down the center.
For the BNC you will trim the center conductor shorter so that it just fits inside the center pin and comes to the correct length when the connector is placed over the cable.
Very Important... Don't forget to put the crimp tube and the heat shrink onto the coax before pulling back the braid or soldering on the connector. I seem to only learn from my mistakes but hopefully you can avoid this annoying mistake.It's always fun to realize you've forgotten to slide the crimp collar or heat shrink onto the coax after you've folded back the braid on the coax or better yet, soldered on the connector and have to desolder it now to get the collar behind it.
 |
| Note the hole through the center pin of the PL-259 Note the crimp collar is ALREADY on the coax (in the shadow behind my thumb) |
 |
| Center conductor exiting the center pin of the PL-259 so that solder can wick down into the pin Cut the conductor that's sticking out of the tip off after it's been soldered. |
I solder the center pin and test that by pulling before crimping the braid so that I can be sure that the pin is firmly soldered to the center conductor.
 |
| Use some heat shrink over the crimped connection because it's sharp |
Neaten up the connection with a bit of heat shrink tubing after you crimp the collar, and wallah!
Demonstration
Here is a little demonstration video. I forgot to make clips showing the actual use of the stripper (all you do is spin it around the cable) and soldering the BNC center pin, but you should get the gist of it. I have a terrible cold today which distracted me bit and made me sound like a frog.
Summary
Take pride that you've made your very own RF jumper cables to connect your BNC equipment to standard PL connected equipment and when other envious HAMs ask where you bought those nifty jumper cables you can look at them with a quizzical gaze and ask "Why would I purchase such a thing, I'm a HAM?"
That's all for now
So lower your power and raise your expectations
72/73
Richard, AA4OO
No comments:
Post a Comment